Archive
Considering Crowdfunding? Check out The Ultimate Guide to Crowdfunding
 If you haven’t heard of crowdfunding by now, it’s not too late. Even if you have heard of it, you might not really understand it. The Ultimate Guide to Crowdfunding is your one-stop source for a lot of information on crowdfunding, successful crowdfunding projects, and the best sources/sites for crowdfunding. The Ultimate Guide to Crowdfunding is an infographic that has hyperlinks to more information about each topic, each source, and each story behind it.
At the top of the infographic, there are links for finding out exactly what crowdfunding is and an analysis of whether it’s right for your business.
On the infographic, you also have a profile of 14 of the top crowdfunding sites with an associated review and a success story.
One thing to note about crowdfunding is that you have to be motivated to raise your funds. It’s not a “set it and forget it” type of thing. And I want to warn you, the results in the success stories are not typical. They are big success stories. For all the projects that get funding, thousands more do not.
Kickstarter, for example, might be the biggest name out there, but in my opinion, it’s the worst of the lot because of its ‘all or nothing’ funding scheme. Again, in my opinion, Indiegogo is a much better site for funding those types of projects. I’ve seen too many good projects go unfunded on Kickstarter that would have benefitted from Indiegogo’s partial funding successes.
In other words, if you setup a $50,000 campaign on Kickstarter and you receive $49,999, you get $0. With Indiegogo, you get $49,999 or however much your contributors pledged toward your campaign. There’s also the problem of non-payment on some of these platforms. Some, like Kickstarter, take the pledges and hold them in escrow until the end of the campaign.
I have yet to use a crowdfunding site for any of my projects, although I’m pondering doing so within the next few months. I have contributed to a number of successful and unsuccessful campaigns on Kickstarter and on Indiegogo.
To setup a crowdfunded project, you have to offer your contributors ‘perks.’ Perks are tokens of your appreciation and incentives for people to contribute to your project. I usually don’t take the perks because I want the artists to receive all the funds I send them without strings and I don’t want them hassled with having to worry about perks when they should focus their energies on the projects that I’m funding.
Crowdfunding can be a great way to get your ideas off the ground, but remember that your contributors will hold you accountable for their earned perks and the project itself, so you’d better be prepared to deliver.
Generally, there’s no payback associated with crowdfunding, although I haven’t checked out all 14 of the sites listed on the infographic. The payback is the project. People like to contribute to something that’s bigger than themselves. Some people, like myself, like to contribute to artists and filmmakers to see just what’s possible through donations. It gives me the power to help people realize their dreams that otherwise they might not have the opportunity to do so.
If I ever win the lottery, I will set aside a portion of the money for artistic projects and endowments. I think that there’s no greater achievement in this world than to create. Whether it’s a mural in the ‘hood’ or a feature-length film, I want to see it happen.
But, this isn’t about me. It’s about the projects and their creators. Crowdfunding is an excellent way to put something into action. If you have the money, go to some of the listed sites, pick some projects, select your perks (if you want them), and fund some hope. If you, on the other hand, are someone who has a project in mind that crowdfunding is a fit for, sign up on one of the sites that’s appropriate for your project and get busy.
Remember that the perks you offer can be very small, such as mention on a website as a contributor. But, as the amount of contribution rises, so do the perk values. Some people offer all expenses paid trips to large contributors, special privileges to the project, part ownership, or some other creative perk. While this is not a review of one particular site/system over another, crowdfunding is a thing and it’s a good thing.
Your mission, should you choose to accept it, is to sign up, log on, create your campaign, develop your perks, and get busy on that project. And one of the ancillary requirements of your campaigns is that you let me know about them. No, I’m not kidding. I’ll even help fund some of them.
I’d like to thank Choice Loans for sharing this infographic.
Quiller: Your private Journal App (Review)
![]() Quiller (App)
Quiller (App)
Journaling App for iPad
From Passion to Purpose, LLC.
$1.99 Apple App Store
Follow: @quillerapp
Remember Doogie Howser, MD. pecking away at the end of every episode in the obscure blue-screened word processor to record the day’s thoughts, hopes, and dreams? Sure you do. Primitive wasn’t it? Well, if Doogie inspired you to begin journaling back then but you never did anything about it, let Quiller bring that inspiration into the 21st Century as an iPad app.
When questioned, something to the tune of 85% of all people want to write for publication but sadly, or maybe happily for writers like me, fewer than five percent ever become published in any kind of forum. But you don’t have aspire to be the next Hemingway or James Joyce to enjoy putting your own thoughts down onto electronic paper or into an electronic journal.
You, like many others, can journal for the therapeutic value or for posterity. But whatever your reason for doing it, Quiller can make it easy–far easier than using a word processor or Big Chief tablet. If you know what a Big Chief tablet is, bless you. If not, it has nothing to do with what you call a tablet today. This one is made of paper and has lined pages. I’m pretty sure that it was the substrate onto which many novels and journals were written. I digress.
Quiller is the new genre of journaling. It is a prompt-driven journaling program that helps you collect your thoughts, navigate the app, and even apply an emotion (via emoticon) to the day.
You can create multiple journals, each with a different look, and you can password protect them too–each with a different password, if you prefer. This also means that if you share a single iPad in your family, each of you can have your own password-protected journal. How do you know which journal is yours? You engrave your name on it. Nice.
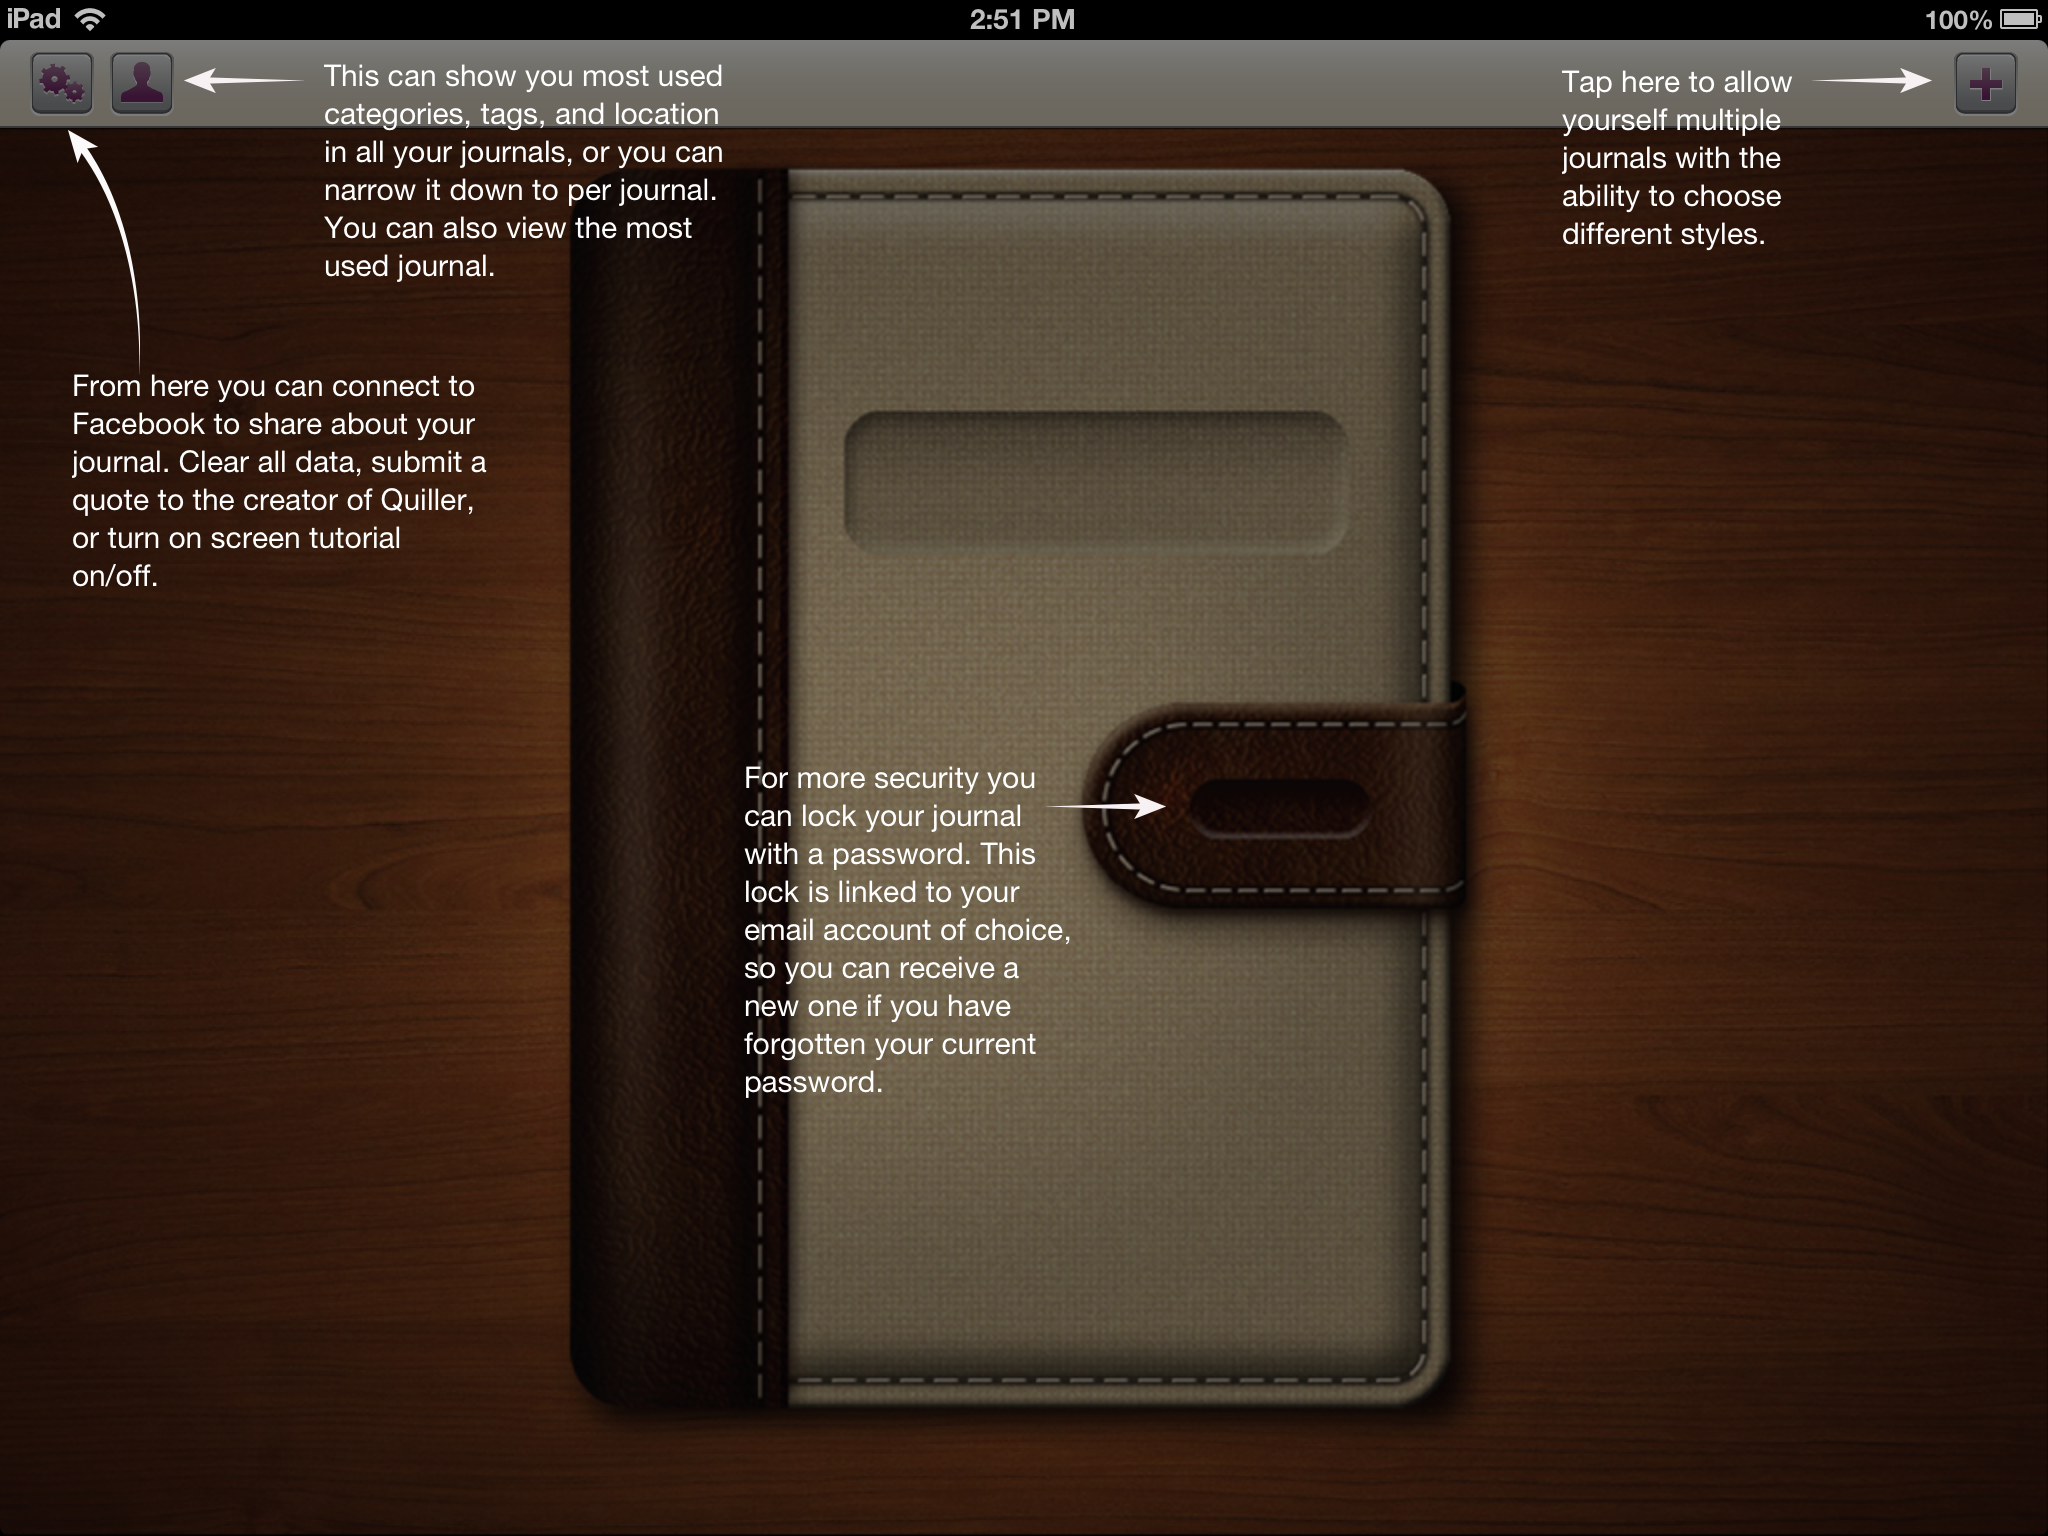
Figure 1: Creating a new journal.
Oh, and if you forget your journal password, you can have it reset via email, so that you never get locked out of your journal.
To understand what’s meant by “prompt-driven,” refer to Figure 1 that shows you what a new journal looks like when you open it for the first time.

Figure 2: Starting your new journal.
As you can see from Figure 2, there are more prompts once you open your journal and begin or continue writing. My daughter left me a message back in June. Yes, I’ve been a bad boy in not getting this review finished months ago. Apologies all around. Better late than never.
To use the journal, simply follow the on screen prompts. It really couldn’t be any easier than that.

Figure 3: Your Personal Stats Page.
There is a very interesting additional detail that the designers put into Quiller: Personal Stats. To get to your personal stats, go back to the home area by tapping the Home icon in the app. Now tap the Person icon at the top of the screen to see a page similar to that in Figure 3.
The other very cool feature shown on this page is that you can export your journal entries as PDF or TXT files. This is an extremely valuable feature if you ever decide to publish or self-publish your writings.
Quiller, at $1.99, is not the least expensive app on the market but it’s certainly one of the finest that I’ve seen at any price. No ads to bug you or distract you. That’s worth 99 cents all by itself. Remember that any “free” apps that you get will probably have ads and those annoying “In App” purchase prompts.
Remember Quiller is prompt-driven not ad-driven.
Why it’s frugal: Quiller is a quality app that helps you get your thoughts down on “paper.” You might not save a bundle of money by using it but if your writing is good and you stick with it, you could become a published writer, if that’s your thing. Buying a quality product that doesn’t constantly tap you to buy something else is worth something.
Since you can create multiple journals and password protect them individually, you only have to buy Quiller once. That’s pretty frugal.
The only features missing from Quiller are the ability to allow you to write with a stylus–or something other than the keyboard and the ability to embed pictures or graphics either from external sources or from your own scribbles.
Review: 9/10
Recommendation: Buy it and write, write, write.
mymosaic App (Product Review)

mymosaic’s Opening Screen
mymosaic App
MindTrip Studios, LLC.
iPhone, iPod and iPad compatible.
$0.99 from the Apple Store
Facebook Page
@mymosaicapp
Since I was a kid, I’ve wanted to make photo mosaics but never had the patience to copy, cut, paste, arrange, repeat. Making mosaic pictures back then is kind of like shooting stop motion videos: the result is so cool but the process is so painful. Well, technology finally caught up with my hedonism/laziness/lack of patience in the form of an iGadget app. Currently, the mymosaic app is only available for Apple products. And for 99 cents, you can’t beat the price.
The two best places to see examples of mymosaic and the creative possibilities are on the mymosaic Facebook page and on the mymosaicapp Twitter feed. There are some OMG photos on there. But don’t be intimidated by them because you too can produce such images with your photos in minutes. Seriously.
You can save your finished mosaics in a variety of sizes while it’s still in the buffer. See the size chart below:
- Mobile – Optimized size for mobile to mobile viewing.
- Small – 10″x10″
- Medium – 20″x20″
- Large – 30″x30″
The Large size gives you the opportunity to save your mosaic in poster size without losing detail.
There’s only one problem with the mymosaic app and I hope MindTrip fixes it because, for me, it’s a major problem. You can only select an entire album instead of individual pictures to create your mosaics. You’ll see what I mean during the following mosaic creation tutorial.
Mosaic creation

Take new photo or select from an album
When you create a new mosaic, either you can take a new photo for the main picture or select one from one of your albums. That part is fine. Step two is to adjust the mosaic options such as number of tiles, color shift, variety, tile consolidation, framed pictures and tile source.
When you select tile source, you’re only given the option of selecting entire albums. I want to be able to select individual pictures for the tiles. What if I want to create a mosaic of my daughter that’s composed of a picture of me and a picture of my wife (Get it?)? I would have to empty out my Camera Roll or create a new album and copy the two pictures into it that I want to use. Both options are kind of a pain.
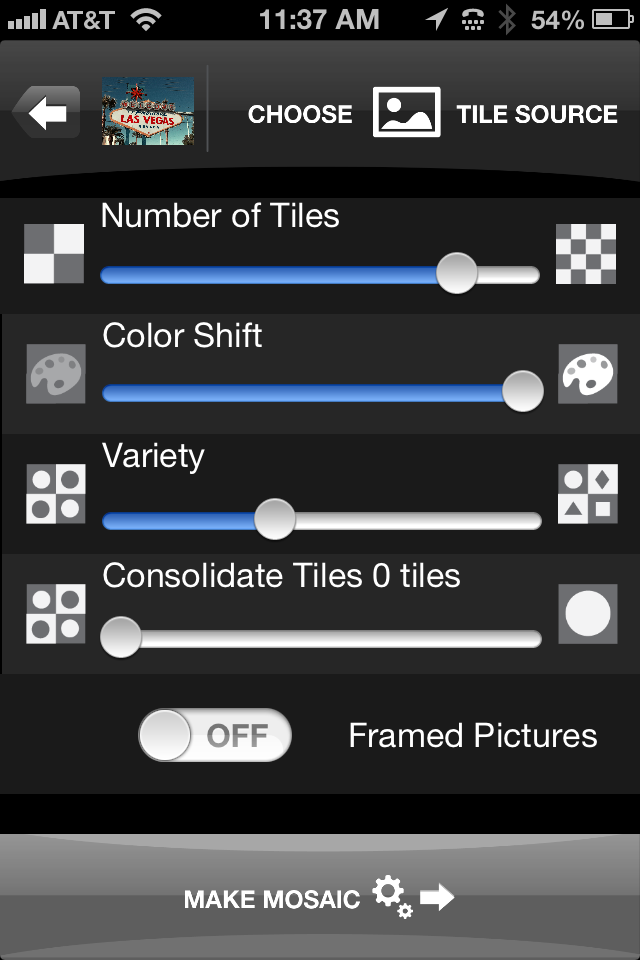
mymosaic’s Option Screen
Once you’ve selected your album, you tap Done to return to the options page and tap Make Mosaic. Your finished mosaic appears ready for you to save to your Camera Roll or to share on Twitter, Tumblr, Facebook or Flickr.
If you don’t like the way your mosaic looks, you can tap the back arrow and adjust your options and recreate the mosaic by tapping Make Mosaic again. You don’t have to recreate it from scratch, since the app holds your source photo and album in a buffer.
You won’t lose the mosaic you’re working on unless you return to the main screen where you select to take a new picture or select one from an album.
The mymosaic app is easy to use and a lot of fun to experiment with. I’ve sent some of my mosaics to Wal-Mart‘s photo lab to be printed and they look very cool. It’s a great way to see your handiwork in a short period of time, since most cities have a Wal-Mart with a short turn-around time photo lab. You can load your pictures into their website and pick up your printed pictures in about two hours.
I really like mymosaic. It’s the app I’ve looked for to create the effect that I’ve longed for: photo mosaics. Below, you can see a mosaic that I quickly created during the writing of this review. The original is a store mannequin that I shot while in Las Vegas at a conference. I took the picture with the Old Camera App and I think it looks quite cool. Click on the photos to see them in full size.
You can mix and match your mosaics too. You can use a source B&W photo and use color photos to create the mosaic or vice versa. The colors will be muted but the effect is still very intriguing.
Have fun with mymosaic. I highly recommend that you buy this app if you want to experiment with mosaics. It’s the most creative fun you can have for 99 cents.
Review rating: 8/10

Original mannequin shot in black and white.
Mosaic using original photo as tile source.
 Techopedia
- An error has occurred; the feed is probably down. Try again later.
Datamation
- 9 Best AI Certification Courses to Future-Proof Your Career for 2026
- Lyrie.ai Deploys Real-Time Zero-Day Tracking Across Global Enterprise Infrastructure
- How To Get a Job in Data Visualization: Ultimate Guide (2026)
- 10 Best Cloud-Based Project Management Software Platforms for 2026
- 76 Top SaaS Companies to Know in 2026
- 16 Top Cloud Computing Companies in 2026
- Minimus Appoints Tech Dealmaker Yael Nardi as Chief Business Officer to Drive Hyper-Growth
- USA₮ Modernizes American Payments with High-Impact St. Patrick’s Day Activation in Times Square
- Google and NextEra Strike AI-Powered Grid Deal
- NYT Sues Perplexity AI in Copyright Conflict


You must be logged in to post a comment.