Archive
2X ApplicationServer XG version 11 (Review)
 2X ApplicationServer XG version 11
2X Software
The 2X ApplicationServer is an application and desktop delivery system, similar to Citrix XenApp or Microsoft’s App-V and RemoteApp solutions.
Pricing: $75/concurrent user/1 year subscription; $93/concurrent user/2 year subscription; $109/concurrent user/3 year subscription. Licensing available in 15 user packs. Support at various levels available at additional cost.
If you’re thinking of using Citrix, or some other product, to deliver virtual desktops or applications to your users, you should hold off until you read this review of the 2X ApplicationServer XG (XG) version 11. XG is a complete Citrix alternative for desktop and application delivery.
It’s rare for me to give such high marks to any product that I review but I really like the 2X ApplicationServer. XG is easy to install, setup, and manage. It supports a wide range of clients and the price is attractive to small and medium-sized businesses. The price is a real treat for larger companies too.
I first looked at the 2X ApplicationServer in 2011 over at Linux Magazine (now defunct), where I showed readers how to connect Linux clients to its published applications via Linux clients.
For this review, I focus mostly on application publishing because to write extensively on every aspect of XG would require that you read 50 or more pages of material. For that level of detail, you can read the product manual. This review is an independent assessment of the product, its features, its pricing, its licensing, and my overall impressions.
I’ve recommended the 2X ApplicationServer product to clients, colleagues, and associates in the past, and I’ve never had anything but praise for the product–especially its extreme ease of use and speed of setup.
Download and Installation
The first thing you need to do is to download XG. You have to fill out the online form to receive your free license key for the product. The evaluation license provides you with the capability of testing 25 concurrent users for two terminal servers or virtual hosts. You can also manage ten devices with the 2X ClientManager application.
After the initial 30 day trial, the software scales back to three concurrent users and three devices for the ClientManager.
The XG download is approximately 95MB and is delivered in the form of a Windows MSI file. Once you download the 2X ApplicationServer XG installer file, double-click it to begin installation. Click through the install wizard, accept the license agreement, and allow the program to install to your system.
The only prerequisite for your XG host system is that it must be configured as a Terminal Server or that you have a Terminal Server available to configure for use with XG.
For my evaluation, I used a Windows Server 2008 R2 Standard Edition on a physical server system. You can install and configure XG on virtual machines. I used a regular server because I already had it setup for another project and it was handy for me. Otherwise, I would have used the virtual machine option.
My server hardware consists of a 2.0GHz dual-core AMD with 4GB RAM and standard SATA II HDD.
The download to completed installation was less than 10 minutes.
Resource Publishing
Publishing an application is quick too. I published Notepad, a classic test application, in less than five minutes. I installed the product and published my first application all without reading a single word of documentation. Try that with any competitive product. Now, for advanced configuration options such as printing, scanning, reporting, and Active Directory integration, I suggest that you read the manual.
But, like all things 2X creates, XG is simple to use, quick to setup, and painless to administer. And the application’s server footprint is extremely small and unobtrusive. The fact that you can run XG on virtual machines proves how lightweight it is.
I like that 2X has setup a menu of sorts for publishing resources. I say resources because you can publish more than just desktops and applications. You can publish applications, folders, desktops, predefined applications, and documents with a few simple clicks.
Predefined applications are applications that you can deploy by simply selecting them from an existing list. Included in the list are control panel applets, network configuration, Windows Explorer, or the Windows desktop as a folder.
Never before has centralized resource publishing been so easy to do.
How to Publish a Resource: Internet Explorer
From anywhere in the 2X Console application, click the Application icon located on the far left of the toolbar. See Figure 1.

Figure 1: The 2X Console.
This launches the Publish New Application Wizard and the first screen you see is the Select Server Type screen where you pick the type of server from which you want to publish your application as shown in Figure 2.
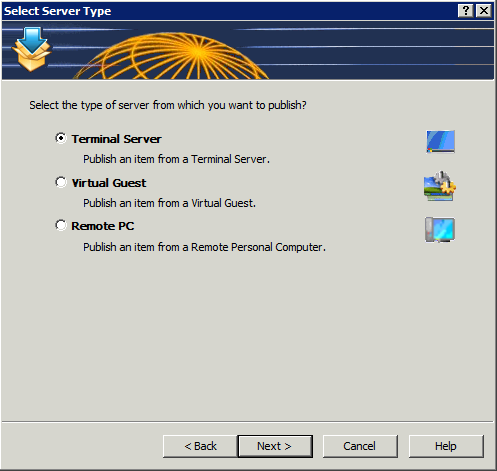
Figure 2: Select the source server type.
I chose Terminal Server because I want to publish Internet Explorer from the local system. Click Next to continue.
Figure 3 prompts you to select the application type to publish: single application, installed application, or predefined application.
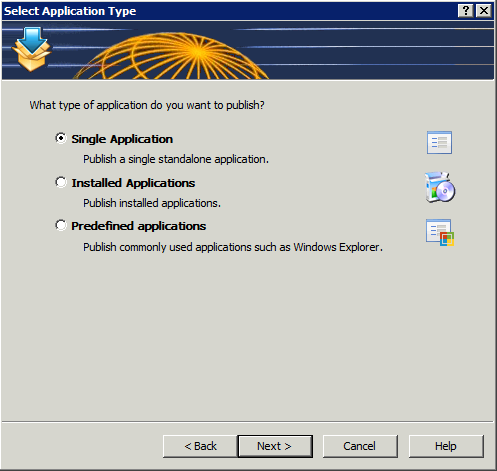
Figure 3: Select the type of application to publish.
I selected Single Application. Click Next to continue.
On this final screen, you’ll give your application a familiar name, select your application (browse to its executable), enter its description, and choose a server from which to run the application. Optionally, you may also select an icon and various application parameters. By default, if you browse to your executable, the optional parameters automatically fill in for you. See Figure 4.

Figure 4: Supply the application details for publishing.
Click Finish to complete the wizard and publish your application. Your published application will appear in the Console window under Published Resources and is ready to be accessed from remote systems that have the 2X client software installed.
Client Access
Download and install the 2X client software appropriate for your device.
Setup the client software to connect to your 2X server by entering an alias (familiar name) for your connection, the server name or IP address of the 2X server, the connection port (default is 80), a username, a password, and the servers “mode.” The mode can be Gateway, Direct, Gateway SSL, or Direct SSL. If you don’t know, try Gateway first. If you aren’t the 2X system administrator, ask the administrator which type you use.
There might be other optional parameters that you can select and tweak but for testing, I suggest leaving everything default. When you’ve finished your client setup, test it by attempting a connection. You should automatically logon to the Windows system and see a list of published resources to which you have access.
Security
Everyone wants to know about security and 2X has it in spades, which means there are so many security options that you can really lock down access to your published resources. For example, in the 2X Console, in the Connection section, you can select domain authentication from the Authentication tab. You can specify the domain, all trusted domains, workgroups, and you can also require authentication before a user can see the list of published resources.
On the Second Level Authentication tab, you specify a provider (Deepnet, SafeNet, or RADIUS) and then you enter exclude list details by IP address, client, or MAC address. Additionally, you can select specific gateway servers to service clients using second level authentication.
If you have a bring your own device (BYOD) program in place but only want to allow certain types of devices to connect to published 2X resources, you can exclude users by the device or client type. For example, if you only want to allow Windows and iOS-based systems to connect, you can exclude all other clients.
There are other security options that you can configure but they require more advanced setup than what I have available to me in my limited lab but I want you to be aware of their existence. You configure groups, 2X client policies, and other options via the Client Manager section of the 2X Console.
Nikolaos Makris, 2X CEO, had this to say about ApplicationServer XG version 11:
“This is a significant release for 2X as it enables businesses of all sizes the ability to scale their virtualization infrastructure according to their organizational demands. We have achieved this through the development of a feature-rich, yet flexible virtual desktop and application delivery solution. Our focus was to provide companies with a cost-effective solution to easily implement and manage a Private Cloud infrastructure. Now that we have released, I’m excited to say that we have achieved our objectives.”
New Features
Sites Management: A farm can be divided into multiple sites with each site representing a single location infrastructure. All sites share the same settings and are isolated. Sites can forward users to other sites if an application or desktop is not available on the current site, if the user is already running sessions on a different site, or if a user is geographically closer to another site.
Role Based Administration: Multiple administrators can modify farm settings at the same time. Different administrators can also have different roles and levels of authority within the system. The settings are stored at the master site, then distributed and activated to the others when the settings are applied. Auditing of who made changes to the system, and when they did so, is also available. If two users try to edit the same object, the second user will find the object locked. If a user adds, edits or deletes an object, the change is shown immediately in the second console. When a user starts the console application they will need to enter their credentials.
Task Menu: The task menu behaves more efficiently when items are selected. On right click in the list control, a context menu can be used. This provides more space for information and makes it easier to add new actions.
Replicate Settings in All Sites: A standard button is used throughout the console so that the same set of settings can be replicated in all sites.
Notifications to Multiple Administrators: Since multiple administrators can be managing the system, it’s possible to send notifications to more than one user depending on the settings used. New types of notification have also been introduced.
Improvements
Start-up Speed of 2X Publishing Agent: When system settings are changed, it has no effect on the agents in use, as the publishing agent will not be restarted but rather it will refresh the actual setting which was effected.
Restructuring of the Console Page: With the addition of Role Based Administration, the console page was structured in a more logical manner, creating a new category for administrator roles.

iPad Client running Internet Explorer and displaying the options menu.
Client Accessibility
You can connect from a wide range of clients to 2X resources. This list is current as of this writing:
- 2X Windows client
- 2X Cloud Portal
- 2X Java client
- 2X Android client
- 2X iOS client
- 2X Linux client
- 2X Mac client
- 2X HTML5 client
- 2X Blackberry client
- 2X Wyse client
- 2XOS client
The range of available clients means that users will be able to connect to published resources regardless of which device they use. This is very good news for companies who participate in BYOD programs.
Why the 2X ApplicationServer XG product is frugal: XG is frugal because of its low barriers to implementation. The pricing is low. The installation and setup are very easy. The management is relatively simple. The security is comfortably high and easy to configure. And you can connect any currently available device to published resources. XG is a lot of bang for the buck and that’s the definition of frugal for me: value.

iPad Client running Internet Explorer and Notepad.
Pricing and Licensing
The 2X ApplicationServer XG is licensed to you as a subscription in one-year, two-year, or three-year increments and by number of concurrent users. The three-year subscription is the most cost effective option at $109 per concurrent user. You have to purchase license packs in increments of 15 users.
The 2X license model is a bit hard to follow. I find it somewhat confusing. The licensing document (link below) attempts to describe several scenarios to help with understanding but the examples aren’t very clear. I don’t understand the expiry terms, upgrade insurance, or the timing when purchasing new licensing.
In my opinion, the licensing could be made simpler. I also don’t really like having to purchase licenses in 15 user increments. But, the license pricing is so good for those 15 that it might matter less to you than purchasing a competitor’s product at a much higher cost. In other words, I can deal with some licensing idiosyncrasies if the numbers are right.
For full pricing and support options, see the 2X Licensing Guide in US Dollars.
Summary
The 2X ApplicationServer XG product can have you up and running published applications in minutes instead of hours or days. You need little to no training to install, setup, publish, and manage a 2X ApplicationServer system.
The price is low enough to where even the smallest companies with the tightest budgets can withstand its pricing model.
And for those really tight budgets, just about anyone with very little training can setup and manage the XG product. For those who don’t want a full-time IT person on staff, you could hire someone to take care of your needs remotely. Publishing an application is so quick an easy that your support costs should be minimal as well.
For my money, the 2X ApplicationServer XG product is the most cost-effective and simplest application and desktop delivery product on the market.
My assessment on a 10-point scale, with 1 being low and 10 being high:
Ease of installation: 10
Speed of installation: 10
Easy to publish resources: 10
Easy to access published resources from remote clients (Windows, Linux, Mac, tablets): 10
License Model: 7
Price/Licensing: 10
Support options: 10
Security options: 10
Client accessibility: 10
You can also check out my ZDNet version of this review.
Diamond Multimedia Wireless Range Extender and Router WR300NR (Review)
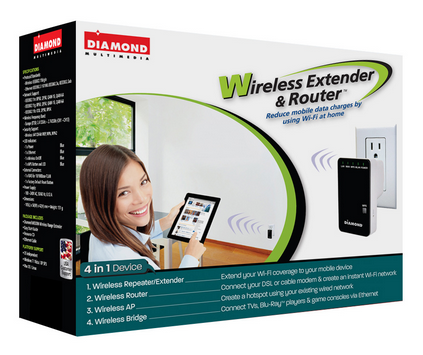 Wireless Extender and Router WR300NR
Wireless Router – Bridge – Repeater – Access Point
Diamond Multimedia
$49.99 Retail/$39.99 Amazon (Prime)
Product Spotlight Video
Diamond Multimedia offers a variety of wireless devices to extend your wireless networks, provide additional security to your wireless users, and to provide some advanced home networking features at a very low cost. The WR300NR (NR) is a sophisticated but inexpensive 4-in-1 wireless networking device. It can act as a router (default), a bridge, a wireless access point (hotspot), and a range extender. You can check out my review of a similar 3-in-1 product (range extender, bridge, wireless access point) from Diamond Multimedia–the WR300NSI Wireless Range Extender for comparison.
This review is not a comparison of the two products but rather a focus on the WR300NR’s router capability, which generally sets it apart from the WR300NSI.
The NR provides you with an extra layer of security as a router that you really need when using public Internet connections such as those in hotel rooms. You can read elsewhere about how non-secure public WiFi hotspots are. The NR protects you by adding a barrier or Firewall between you and the outside world.
 Setup is easy with the NR.
To start, plug in the device into any standard electric socket. Use the included RJ-45 network cable to plug into the LAN side of the device and the other end into the network card (NIC) in your laptop or desktop computer.
Restart the computer that’s connected to the NR or disable/enable the NIC to refresh its connection so that the NR supplies your computer with an IP address.
Open your favorite Internet browser application (Internet Explorer, Chrome, Firefox, etc.) and point it to http://192.168.10.253.
When prompted, enter admin for the username and admin for the password.
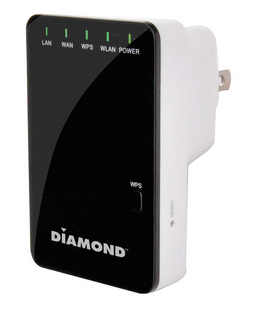
The initial screen opens for you. Note the navigation area on the left side of the screen. See Figure 1 for reference.

Figure 1: WR300NR Main Setup Screen
Use the included instruction booklet and the Wizard selection from the web page’s navigation menu to setup your NR. Router is the default setting. Click NEXT to continue.
If you’re setting up the NR to be your Internet gateway, then you’ll need to refer to your Internet provider’s documentation to tell you what kind of connection you have so that you can set your NR’s router mode: Fixed or Static IP Address, Dynamically assigned IP Address (DHCP), or an ADSL dialup (PPoE).
You can also setup your SSID, channel (Auto is fine), and security mode (Disabled, WPA, WPA2, or WPA/WPA2 mixed). I suggest WPA2.
NOTE: Do NOT leave your router in Disabled mode (default). Always use security on your home network so that passersby, neighbors, and criminals can’t piggyback onto your connection and potentially get you into trouble by downloading or uploading illegal files or participating in other illegal behavior at your expense.
That’s all there is to it. Basically one step with a few subparts. Click SAVE & REBOOT to save your settings and reboot the device.
For advanced users, there are many tweaks and settings to alter. You can configure the Firewall to meet your needs, change the Wireless settings, and edit just about every possible parameter.
Don’t worry about messing up or configuring yourself out of the device completely, since you can always reset the device to factory defaults by pressing the RESET button with an ink pen located on one side of the NR. Remember that if you do this, all of your changes will be gone. You will also have to reconnect to the device as described above by pointing your browser to http://192.168.10.253 and using username admin and password admin to return to the configuration screen.
Also, you’ll want to change the username and password for your router from the default. You don’t want to leave it as admin/admin. To change the username and password, click Management in the navigation pane. Why do this? Because if someone attempts to hack into your network, the first username and password combination he’ll try is admin/admin.
Remember to change the username and password if you travel and have to reset the NR. For $40, you could always buy two: One for home and one for travel.
The NR is a very capable router and firewall. For the money, it might be the best I’ve seen. There are many devices in this group from which to choose but none as small (2.9 x 1.9 x 1.6 inches), as feature-filled, or as competitively priced as the WR300NR.
Why it’s frugal: You could spend more for a larger device with the same or similar features and pay a lot (2-3X) more but why would you when the NR has everything you need? For $40 and free shipping from Amazon (For Prime members), it doesn’t make sense to buy anything else.
Rating: 9/10
Recommendation: Buy it. Use it at home and take it with you on the road.
 Techopedia
- An error has occurred; the feed is probably down. Try again later.
Datamation
- Envirotech Vehicles (NASDAQ: EVTV) Closes Merger with Azio AI Ahead of Schedule, Positioning Combined Company to Capture $487 Billion 2026 AI Infrastructure Opportunity
- HoneyBook Study Finds Photographers’ Biggest Challenge Is Managing Client Bookings
- Minimus Expands Enterprise Security Platform with General Availability of Advanced Supply Chain Controls
- Top 7 Cloud Data Warehouse Companies (2026)
- 9 Best AI Certification Courses to Future-Proof Your Career for 2026
- Lyrie.ai Deploys Real-Time Zero-Day Tracking Across Global Enterprise Infrastructure
- How To Get a Job in Data Visualization: Ultimate Guide (2026)
- 10 Best Cloud-Based Project Management Software Platforms for 2026
- 76 Top SaaS Companies to Know in 2026
- 16 Top Cloud Computing Companies in 2026


You must be logged in to post a comment.