Archive
Making it Move with MotionComposer for Windows (Review)
 MotionComposer 1.0.14
Aquafadas
$149 US
MotionComposer for Windows
Also available in Mac format.
MotionComposer is a desktop application that allows you to create Flash or HTML5 animations for your website or animated ebooks for iPad and iPhone. MotionComposer is a relatively complex program that has just about every bell and whistle imaginable for creating dynamic content. I like the application. It’s too bad that I’m either not smart enough to create really good content or I haven’t spent enough time with it to do so.
I’m too embarrassed to post my creation for you to see but I can see how easy it is for someone who can spend time with the application to learn its ways and means.
It’s a very powerful program that I would compare to Adobe Photoshop in flexibility, power, capability, support, and complexity. Don’t mistake the application’s complexity for complexity of use. The program is complex but its operation is simple.
The user interface is clean and enjoyable to use. It is responsive and does exactly what you tell it to do. MotionComposer is one of those programs that you could use to create an interactive training device, a dynamic website, an animated ebook, magazines, newspapers or just about any animated digital content that you can imagine. I’d love to have expert knowledge of it but I may never gain that kind of competence with the application on my own.
MotionComposer’s website makes the following claims:
MotionComposer makes your life easy
- No coding required.
- A clear user interface lets you create beautiful animations effortlessly.
- Publish in Flash® and HTML5 in a single step.
- Publish content to any computer, smartphone, and tablet, including iPhone and iPad.
- Optimized HTML5 code ensures the best performance of your content on iPhone and iPad.
I’d have to agree. Even my very poorly conceived animation worked very well. If you’re a graphic artist, designer, web administrator, ebook creator, or creative person in general, you’ll love it. And for $149, it’s easy on the wallet too. Seriously, these types of applications, if you’ve priced them, are far more expensive or you have to purchase add-ons or modules to do what this one does as is.
Creating content with MotionComposer reminds me a bit of creating a stop motion movie. You begin with a timeline and slides. From there, you add graphics or text and edit the transitions and movements of your objects. It’s great fun actually and not anywhere near as tedious as creating a stop motion movie.
The app features multiple transitions for elements, such as text fly-in, transitions between slides, audio capability, zoom and more. If you really want to see it in action, watch the demo video.
I have some good advice for you after working with this application for a few hours. First, if you’re a beginner with this kind of app, read the docs, watch the demo video and learn its capabilities before you experiment. It’s easy but it’s not child’s play. This is a professional application that requires mastery. If you’re a pro who’s coming at this from another similar application or from some other method, you’ll love it.
In all, I think the price plus performance rate this application at a solid 8.5 out of 10 for me. A company representative told me that there is a newer version coming soon that will knock your socks off. Frankly, I never liked socks anyway. I can’t wait. I hope they allow me to upgrade. This is one app that I’d love to master and use.
Rating: 8.5/10
Recommendation: Buy and Learn.
iStopMotion for iPad (Product Review)
iStopMotion for iPad
Boinx Software Ltd.
$9.99 iTunes Store
App for making stop motion and time lapse videos
Related product: iStopMotion Remote Camera (Free)
I was pretty excited when asked to review iStopMotion for iPad, since I’ve been a fan of stop motion video and claymation since I was a kid. I remember watching Gumby, Davey and Goliath, and all of those holiday claymation shows and loving them. I have always wanted to make my own stopmotion movies but never knew how. Plus, it takes a LOT of patience to make them, even with a cool app like iStopMotion for iPad.
And iStopMotion for iPad is cool. I like it. The really cool part about it is that you can install iStopMotion Remote Camera for your iPhone and use it as your camera and save your photos to your iPad without having to do anything more than clicking the shutter button.
I like the onion skinning feature too. This allows you to see where you’ve been on the previous shot so that you can move your objects a small amount so that the movie doesn’t look jumpy.
Over on your iPad, iStopMotion assembles your snaps into a stop motion video for you. One word of caution here, though. Don’t assume, like I did, that iStopMotion will allow you to manipulate your movie a great deal–it doesn’t. Now, if you’re a Mac owner and you also have iStopMotion installed, you might be able to do more but all you can do with the iStopMotion for iPad app is delete the current frame, delete all frames, duplicate the current frame, or reverse the order of all the frames.
Hopefully in the future, Boinx will give us more editing features with the app. One I would love to see is the ability to export the video into individual frames. I need this feature because, like most filmmakers, I do not necessarily create in linear order. I need the ability to move frames.
I created a short video but didn’t realize the limitations so it won’t be posted here. Sorry. It was basically two hours wasted because I wasn’t aware. I guess I didn’t read the fine print.
That said, I think that if you create your movies in linear fashion, meaning you create your video from the beginning and work through to the end, then you’re fine. Unfortunately, I was going to work my magic in “Post.”
The app does exactly what it should otherwise. You can create all kinds of really cool stop motion movies, claymation animations, text-based animations and more. Don’t let my ignorance of the app cloud your decision to use it or not. I think it’s a very cool app and having the ability to shoot with the far more agile iPhone is the absolute coolest feature.
For my studio setup, I used an 18″x24″ whiteboard, an iPhone 4, an iPad 4, a tripod and phone holder, and a dimmable, fluorescent ring light.
You can share and upload your movies via the app to Dropbox, YouTube, or save to the Camera Roll.
I think to get a full appreciation out of this app and what you can do with it, you’d have to own a Mac equipped with iStopMotion or maybe iMovie, although I’m not 100 percent sure that the movies are editable in iMovie. I don’t own one, unfortunately.
So, in a very rare move, I’m offering two different review results for this app.
9/10 for Mac owners who also own iStopMotion.
6/10 for everyone else.
Momentisa app (Product Review)
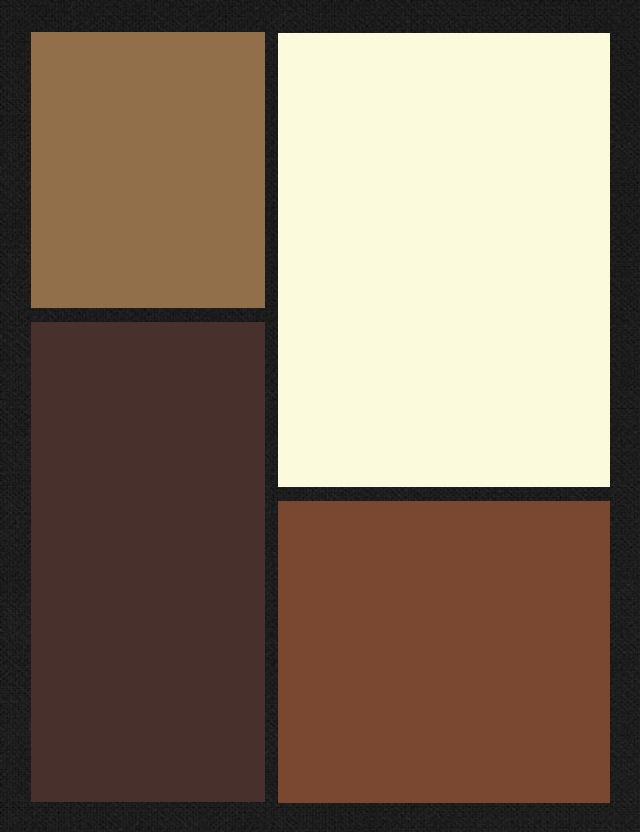
Figure 1
Momentsia
madbits, LLC.
Free
iPhoneography effect app
I am an avid freelance, semi-pro photographer and as such, I really enjoy all types of photography from the very lowest common denominator of point-and-shoot film cameras all the way up to my fancy shmancy digital SLR (Canon T3). I’m equally intrigued by iPhoneography. I like the instant effects I can get with different apps that mimic, almost imperfect pixel by imperfect pixel, the effects I get with film and cross processing. I’m also a big fan of art, especially the various schools of modern art or what I call modern art–from the post Impressionists through the Bauhaus movement all the way up to what’s popularly known as Post-modernism*.
The Momentsia app gives you sort of a Modrian type effect in multiple collage type frames. See Figure 1 for an example.
The app is very simple to use. See steps below. Once you open the app and select the frame style that you want from the dozens of options, then tap a frame to take a picture with your phone’s camera to send to that frame. Repeat for the other frames.
Using Momentsia
- Select a layout.
- Capture or select a picture.
- Save or share.
If you’d like to add any shots from one of your albums, then tap and hold to bring up your album options. Select a photo for the selected frame and continue until your frames are filled. You can also use your front or rear facing camera with this app to get yourself into the action.

Figure 2: Mannequin collage
You can perform some minor manipulation like zoom in, zoom out and pan on your photos, which can give you some more interesting effects even with the same photo. See Figure 2 as an example.
The photo in Figure 2 is the same mannequin picture used for each frame. I zoomed in on the face for the lower left frame. The upper frame is a zoom and pan. The lower right frame is the original photo as it landed into that frame.
You can change the frame arrangement after your photos are in place if you want by tapping the design icon. Your photos will stay in the buffer. You can add, remove, take new shots and rearrange your pictures an infinite number of times.
Once you’ve completed your new masterpiece, you can save it to your Camera Roll, email it to a friend, post it to Instagram, attach to a tweet or post on your Facebook page.
The app is easy to use, versatile, offers lots of options and does what it says it does: creates collages.
Momentsia is free but I think if madbits wanted to monetize this app, they could for a cool 99 cents. I don’t think many people would pay more for it and it’s totally worth a buck for all you can do with it.
One thing to note about this app: the colors you see in the design preview have nothing to do with the actual colors in the end product. I’m not exactly sure why there are different colors, since they have no apparent effect on your photos.
In all, Momentsia is fun to use and is a great little app to have for you iPhoneographers out there who want something a little different to play with. I say, “Get it.” Why not, it’s free so if you hate it, you can delete it without a moments (Yes, that’s a slight attempt at a pun) remorse.
I give Momentsia a 7 out of 10 because there are few options and I can’t figure out how to get color tinting, if it’s even an option, for my frames. It’s a “good enough” app for a collage special effect but don’t expect spectacular and you won’t be disappointed. Hey, it’s free, after all.
Review: 7/10
*In today’s terms, Post-modernism would no doubt have the name Modernism 2.0.
mymosaic App (Product Review)

mymosaic’s Opening Screen
mymosaic App
MindTrip Studios, LLC.
iPhone, iPod and iPad compatible.
$0.99 from the Apple Store
Facebook Page
@mymosaicapp
Since I was a kid, I’ve wanted to make photo mosaics but never had the patience to copy, cut, paste, arrange, repeat. Making mosaic pictures back then is kind of like shooting stop motion videos: the result is so cool but the process is so painful. Well, technology finally caught up with my hedonism/laziness/lack of patience in the form of an iGadget app. Currently, the mymosaic app is only available for Apple products. And for 99 cents, you can’t beat the price.
The two best places to see examples of mymosaic and the creative possibilities are on the mymosaic Facebook page and on the mymosaicapp Twitter feed. There are some OMG photos on there. But don’t be intimidated by them because you too can produce such images with your photos in minutes. Seriously.
You can save your finished mosaics in a variety of sizes while it’s still in the buffer. See the size chart below:
- Mobile – Optimized size for mobile to mobile viewing.
- Small – 10″x10″
- Medium – 20″x20″
- Large – 30″x30″
The Large size gives you the opportunity to save your mosaic in poster size without losing detail.
There’s only one problem with the mymosaic app and I hope MindTrip fixes it because, for me, it’s a major problem. You can only select an entire album instead of individual pictures to create your mosaics. You’ll see what I mean during the following mosaic creation tutorial.
Mosaic creation

Take new photo or select from an album
When you create a new mosaic, either you can take a new photo for the main picture or select one from one of your albums. That part is fine. Step two is to adjust the mosaic options such as number of tiles, color shift, variety, tile consolidation, framed pictures and tile source.
When you select tile source, you’re only given the option of selecting entire albums. I want to be able to select individual pictures for the tiles. What if I want to create a mosaic of my daughter that’s composed of a picture of me and a picture of my wife (Get it?)? I would have to empty out my Camera Roll or create a new album and copy the two pictures into it that I want to use. Both options are kind of a pain.
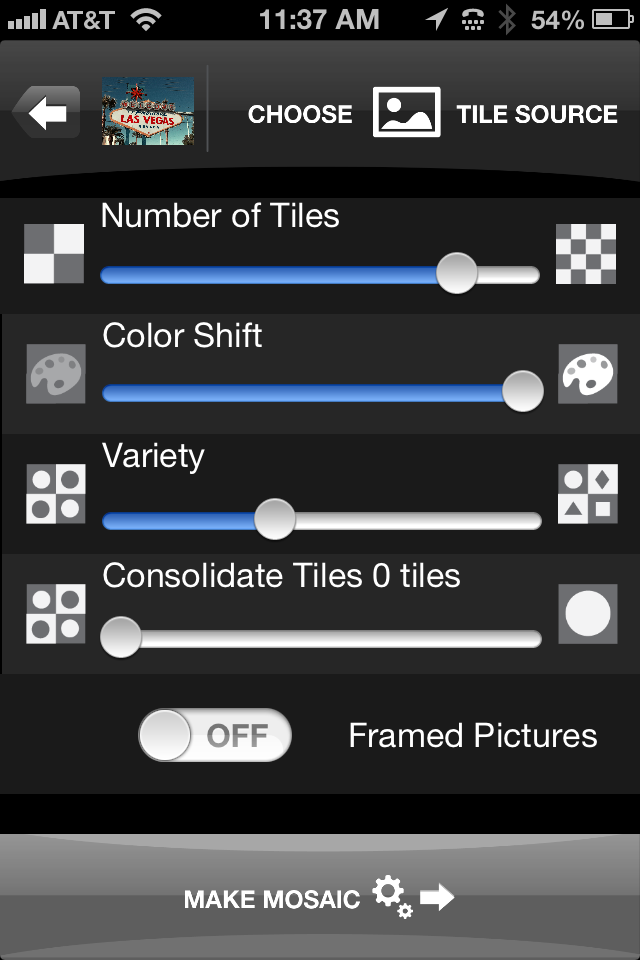
mymosaic’s Option Screen
Once you’ve selected your album, you tap Done to return to the options page and tap Make Mosaic. Your finished mosaic appears ready for you to save to your Camera Roll or to share on Twitter, Tumblr, Facebook or Flickr.
If you don’t like the way your mosaic looks, you can tap the back arrow and adjust your options and recreate the mosaic by tapping Make Mosaic again. You don’t have to recreate it from scratch, since the app holds your source photo and album in a buffer.
You won’t lose the mosaic you’re working on unless you return to the main screen where you select to take a new picture or select one from an album.
The mymosaic app is easy to use and a lot of fun to experiment with. I’ve sent some of my mosaics to Wal-Mart‘s photo lab to be printed and they look very cool. It’s a great way to see your handiwork in a short period of time, since most cities have a Wal-Mart with a short turn-around time photo lab. You can load your pictures into their website and pick up your printed pictures in about two hours.
I really like mymosaic. It’s the app I’ve looked for to create the effect that I’ve longed for: photo mosaics. Below, you can see a mosaic that I quickly created during the writing of this review. The original is a store mannequin that I shot while in Las Vegas at a conference. I took the picture with the Old Camera App and I think it looks quite cool. Click on the photos to see them in full size.
You can mix and match your mosaics too. You can use a source B&W photo and use color photos to create the mosaic or vice versa. The colors will be muted but the effect is still very intriguing.
Have fun with mymosaic. I highly recommend that you buy this app if you want to experiment with mosaics. It’s the most creative fun you can have for 99 cents.
Review rating: 8/10

Original mannequin shot in black and white.
Mosaic using original photo as tile source.
The Rocksteady XS Bluetooth Speaker: A Modern Take on the Boombox of Yesteryear (review)

Rocksteady XS bluetooth portable speaker.
Killer Concepts, LLC.
$89.99
Killer Concepts, LLC., introduces a new portable, bluetooth speaker that will blow you away: the Rocksteady XS. This little black box is the best and loudest bluetooth speaker that I’ve ever seen. The unit has a simple design, a tough construction, speakers that have a near-deafening upper end and a range that will knock your socks off.
OK, I’m not much of an audiophile and I’m often annoyed by people who obsess over music gadgetry. From high priced direct drive turntables and super woofers to boomboxes and ghetto blasters to Sony’s Walkman products to MP3 players to smart phones, I’ve always found them to be rude, offensive and irritating–just like their owners. That said, since I’ve begun working out daily at the local YMCA again, I find myself taking my iPhone and earbuds to assist me on my quest for the perfect physique. I’ve become what I used to hate, an audiophile, or at least an irritating facsimile of one.
I digress.
The Rocksteady XS arrives with a USB cable, a charger interface, a small instruction booklet and itself. You don’t need anything else.
Just larger than a Nintendo Wii remote, it measures approximately 6.5″ long and is just under 2″ on all four sides. It’s very lightweight–a half pound maybe? On one side is the power button, Line In jack, DC-5V interface and a USB 3.0 interface. On another side is your battery access panel. On another face, you have the primary music controls: Play/Pause/Stop, Volume controls and next/previous track. There is also a Mode button that, when pushed, pairs your Rocksteady XS speakers with your bluetooth capable device.
Operation is simple: Power On, press Mode, pair the device, play music.
Your phone/tablet/computer controls also control the play/pause/stop, speaker volume and track selection so that no matter which one you’re closer to, you have maximum control.
Just for fun, my wife and I tested the speaker outside with my iPhone 4. I started playing a song on my phone with the Rocksteady XS paired. She walked down the street away from me to test the connectivity distance and the sound quality outside.
Both surprised us. She was over 100 feet away and I could still hear the music and control the speaker volume and track selection from my phone. I didn’t expect that kind of distance. At most, I figured 30 to 40 feet but over 100 really impressed us.
We switched tracks, played saved music, played Pandora, played audiobooks and my daughter even played back some voice recordings that were on the phone. Whichever app has the foreground is the one that you can hear through the speaker.
We’ve had a good time reviewing the Rocksteady XS bluetooth speaker. It’s a high quality device that you will enjoy using. We love it. My wife wants one and that’s significant because she doesn’t ever request technology. In the past ten years, she’s only asked for a few bits of technology: a laptop, an iPhone, an iPad mini and the Rocksteady XS. Mother’s Day is coming soon so I’m sure she’ll have one.
The Rocksteady XS speaker retails for $89.99 on Amazon.com. A bit pricey, in my opinion. I think a $49.99 price point would be far more attractive to me but my wife didn’t seem to have a big problem with $90, so maybe I’m wrong. It’s definitely cool, very portable, extremely well built/designed and loud enough that it doesn’t sound cheap or “tinny.” It sounds like a much larger device. The sound quality is very good. I say, “Buy it.”
I give it a 8.5 out of 10 because of the price and that it only comes with a 90-day warranty. For $90, I really think that one year is more appropriate.
Review: 8.5/10
Recommendation: Buy it.
A Lomographers Dream Come True: Tiffen Photo fx App (review)

Tiffen Software
Tiffen Photo fx
$2.99 Apple App Store
I don’t review many apps and there’s a good reason for it: not that many are really worth a good review. I don’t like to pan products unless I feel ripped off by them, so generally, if I review a product or piece of software, the review is going to be more positive than negative. The Tiffen Photo fx app is really good. Hopefully, that assessment is enough to pique your interest enough to read why I think it’s so good.
Tiffen’s Photo fx app is a Lomographer’s dream. I don’t know if that’s what Tiffen had in mind when they created this little gem but it certainly was the outcome, for me, at least.
I am a Lomographer. I own multiple cameras and much to my wife’s chagrin, I often lug two or more at a time with us on walks, trips and events. Yes, I also own a nice Canon EOS T3 digital SLR and an iPhone 4 with camera apps but I like the look and feel of film too.
However, <deep breath> I sometimes forego packing up like a beast of photographic burden and just carry my iPhone. Luckily for me I have Tiffen’s Photo fx app to make up for the unbearable lightness of being sans plastic cameras.
But enough about me and my hangups, you want to know about my review of the Photo fx app. Well, I like it. I like it a lot. In fact, I can just about reproduce every “Lomo” effect with it that I can get with one of my many Lo-Fi cameras. It pains me to say that because I really love my cheap, crappy cameras that most people would toss away like yesterday’s newspaper. Sorry about the newspaper reference there–I guess I’m not only dating myself but am going retro again.
The Photo fx app’s main screen allows you to either take a new photo or dig one out of your Camera’s photo gallery. The “effect” is the same so don’t sweat it if you didn’t take the picture with Photo fx. Once you either take a new photo or select one from your gallery of masterpieces, the fun begins.
There are dozens, if not hundreds (I don’t have the patience to count) of effects that await your creative eye. And these aren’t “canned” effects–each one is adjustable on one to three different parameters. The parameters could be brightness, blurriness, sharpness, skew, color intensity and many more. Each effect has its own range of things (parameters) that you can change for that effect.

One of the many effects is Photographic, which mimics different film types, filter types, exposures and so on. If you’re a photographer with any chops, you know what I mean. There are five pages of these photographic effects that vary from these yellows to blues, greens, reds and some other “one off” colors such as amber.
This single effect almost makes fun of photographic anachronists like myself because of the range of predictable creativity you get with it. You don’t get this kind of predictability with film or even digital cameras. You have to import the photos into another expensive program that will remain nameless here and then you have to manipulate it with masks, layers and so on until you get the right visual effect. Sure, your results might be a little better but I’ll have mine on Twitter or in an article way before you will.
The next two screen shots give you a look at two other effect matrices available to you: Special FX and Tint.

I took this picture of the iconic landmark Las Vegas sign on my recent trip. I’d never seen the sign before and had to do it this time. My wife and I walked from Mandalay Bay to the sign and back. We stayed at Caesar’s Palace and walked to Mandalay Bay first, then on to the sign. Not a short trek.
I used the sign because it has a good range of colors and it’s something that’s familiar to everyone.
The Tiffen Photo fx app is a very good buy at $2.99. It sounds a little pricey for an app but you’ll find no other app or three apps that can do all that it does. And in photographic equipment dollars, this app definitely saves some big bucks with its many effects–some of which would only be available through some darkroom trickery or expensive software manipulation.
 I give the Tiffen Photo fx app a solid 9 out of 10. Though it’s totally worth it, the price still leaves me a little flat. I think they’d get more traction at $1.99 but it’s not my call. It’s still a bargain at $2.99, especially if you’re an avid iPhoneographer like me. I say, “Get it.”
Review: 9/10
Recommendation: Get it.
 Techopedia
- An error has occurred; the feed is probably down. Try again later.
Datamation
- Google and NextEra Strike AI-Powered Grid Deal
- NYT Sues Perplexity AI in Copyright Conflict
- Cloudflare Outage Affects Major Websites
- OpenAI Forces AI to Confess Its Lies
- OpenAI Declares Code Red as Google’s Gemini 3 Threatens ChatGPT
- Coupang Breach Exposes 33.7M South Koreans’ Data
- ChatGPT Celebrates Third Anniversary
- Asahi Group Reveals Findings of Cyberattack
- OpenAI Discloses Mixpanel Security Incident Affecting Some API Users
- Firefox Zero-Day Flaw Exposed 180M Users


You must be logged in to post a comment.