Archive
The Tivax MiTraveler 8-inch 3D Tablet: No Glasses Required (Review)
 MiTraveler 3D-8
Tivax/Michley Electronics, Inc.
Amazon (Prime) $240.71 (Retail: $369.99)
I didn’t know what to think when I first heard of the Tivax MiTraveler Android-based 3D tablet, except, “This I have to see.” The No Glasses Required part of the advertisement was especially intriguing to me. I wanted to see if it looked 3D or if it looked like the 3D pictures of my childhood that had that blurry, headache-inducing, “deep sight” kind of thing going on.
Although it took me almost an hour to figure out how to switch into 3D mode, I’m glad that 3D isn’t the default mode. I, personally, can’t look at 3D video for very long at a time. It’s interesting when I’m in a darkened theater and that’s my only focus but an 8-inch tablet is quite a different story.
It works. You can see movies or photos in 3D without glasses. But, for me, the technology still isn’t where it needs to be for prolonged use. Right now, it’s more of a “Hey, look what my tablet can do” sort of thing. That’s just my opinion. If you’re interested in viewing movies or photos in 3D, check one out at a retailer or spring for the $240 and buy one direct.
Specifications
- OS Android 4.1 Jelly Bean
- Dual-core CPU
- Flash 10.1 supported
- Parallax barrier 3D technology
- Capacitive multi-touch screen
- 8GB storage
- 1G RAM
- Resolution: 1280*800
- Wi-Fi 802.11 b/g/n
- Micro SD card port for storage expansion up to 32GB
- Micro USB port
- Mini HDMI output
- Built-in speaker & microphone
- 0.3M front camera and 2M rear camera
- 5000mAh Li-Polymer battery
- Supports Bluetooth
Don’t get me wrong, I like the MiTraveler tablet, even in 3D mode. I’m just saying that I can’t look at it for a long period of time, at least not without Dramamine. It’s a me thing, not a Tivax tablet thing. The 3D effect on the MiTraveler is very good and there are actually three 3D modes to choose from. My favorite is the 2D to 3D effect. It looks more like a real 3D movie. The horizontal and vertical 3D modes have to be used with photos and movies that specifically use those techniques, otherwise they are unwatchable. You can experience the real 3D effect with the 2D to 3D mode.

Figure 1: Video Options Bar
You can switch into 3D mode with a single tap while watching a video. When you start a video, tap the 3D icon in the video options bar shown in Figure 1. Unfortunately, in 3D mode, the Android tablet doesn’t seem to allow me to take screenshots. I assume it’s because it doesn’t know how to render them. In your case, the video will be playing in the background. This particular video shows two side-by-side pictures, which when combined, create a very nice 3D effect.
So, the exact steps to see a movie in 3D are:
- Start the movie.
- Tap the screen once to launch the Video Options Bar at the bottom center of your screen (Figure 1).
- Tap the 3D icon to launch a 3D Options Menu.
- Select the option that will play your video.
- For the Transformers demo video, select 3D Left Right.

Figure 2: 3D Options Menu
See Figure 2 for the 3D Options Menu.
If you want to view a “normal” video in 3D mode, select the 2D to 3D option.
You can browse the web and the local filesystem for videos, so you aren’t limited by delivery method. You can adjust the sound volume to suit you but beware that different videos have different sound levels and you’ll have to adjust each one accordingly. This is not a fault of the tablet, but normal variation in video production quality and style.
As far as other functions, the tablet looks fairly limited upon first glance. The default desktop would lead you to believe that the MiTraveler is primarily a photo and video viewing device. It isn’t.
Figure 3 shows you the desktop and all available default desktop apps: Browser, Email, Camera (front and rear facing), STREAMit, and Music. If you want to see all of the installed apps and the Google Play Store app, tap the multi-window icon in the upper right corner of the main desktop screen. There you’ll see all of your standard apps plus a few extras that are sound, movie, and game-related to take full advantage of the tablet’s 3D and accelerated 2D capabilities. You can copy any app to the main desktop by pressing and holding its icon for a few seconds, so you can customize the MiTraveler in any way you like.
You can download apps, remove apps, and treat it as you would any other Android device. The only difference is that this one can render video in 3D.
Why it’s Frugal: The Tivax MiTraveler 3D 8-inch tablet is anything but frugal. But, it’s a specialty item and it’s not designed or marketed as a frugal or inexpensive device. It’s more than a standard Android device but functions like a standard one except for the 3D enhancements.
The Tivax MiTraveler is an excellent 3D video movie and photo viewer. If you love 3D video, you’ll love this tablet. If it’s not your thing, save your money. You’re probably asking yourself (and me) if I think that the tablet is worth the money for the 3D enhancements. Good question. I think it is. The 3D is smooth and well done. I’m not sure how they do it and like making laws and making sausages, I don’t think I want to know how it’s done. I appreciate it for what it is. I don’t need the details.
The MiTraveler is a quality device that does exactly what it says it can do. I tried to find something wrong with it and couldn’t. So, if you have $250 and you want a 3D capable tablet, this is the one you want.
Rating: 9/10
Recommendation: Buy the Tivax MiTraveler 8-inch 3D tablet for awesome 3D rendering. And remember, no glasses required.
Little Scholar Educational Tablet for Kids (Review)
 Little Scholar
(Little Scholar Educational Tablet for Kids)
School Zone
$199.99
The Little Scholar™ tablet is an 8″ Android tablet designed by School Zone especially for children ages 3 to 7. Almost 40 years ago, James Hoffman, Ed.D., and his wife Joan Hoffman, M.A., began a retail supply outlet for teachers. Soon after that, they began School Zone Publishing and created flash cards and workbooks for students. You’d be hard pressed to walk into a teacher’s supply store and not see a School Zone product. School Zone is the brand that teachers and parents of young learners depend on–and have depended on for close to four decades.
The Little Scholar has a bright and cheery screen featuring delightful characters that kids love. The screen is fully touch interactive. Each tablet comes packed with games, songs, and apps that provide hundreds of hours of learning fun for your kids. The Little Scholar also comes with front and rear-facing cameras that your child can use to take photos and movies. And if you enable it, the Little Scholar can connect to WiFi access points to give you Internet access, including access to the Little Scholar app store where you can purchase more games and apps.
Internet access also helps keep your tablet up to date with the latest patches and software revisions.
For Parents
Turn on the Little Scholar by pressing and holding the power button for about three seconds. Be patient after you see the Lexibook logo and the School Zone logo as it takes a little while for the unit to completely power on. To access the settings, including WiFi, sounds, and so on, tap and drag the lock icon to the right until you drag the lock onto the circle. Once the unit unlocks, tap the gold lock icon in the upper right of the screen.
123 is the default password. Tap the Submit button after entering the password. Now you can access everything on the tablet that isn’t usually visible to your child. From the screen you see now, tap Settings.
 If you have an Android tablet, this screen looks familiar to you. Here is where you setup WiFi access, Bluetooth, check data usage, and adjust or view other relevant technical settings of the tablet.
The tablet comes with an instruction manual that is very good but this is such an important aspect of the inner workings of the tablet, I thought I’d make a point to share this with you. For the most part, the settings and other configurable items are intuitive for anyone who’s worked with any type of cell phone or tablet device. You don’t need a lot of experience or expertise to make the necessary changes. If you need assistance, ask anyone over the age of ten. <wink>
If you leave the Settings area and return to the Home screen, you will have to re-enter the password to make any other changes. It’s also a very good idea to change the password so that your child doesn’t stumble onto it by mistake and make changes to the system that might prove difficult for you to undo.
 To reset the system password (The 123 one), tap the Go Back icon (Bottom Left Corner) to return to what I call, The Parental Options Screen or Parental Lock Screen, and tap Reset Password.
From this same screen, you can hit Schoolzone.com, go to the App store and purchase and download new apps, provide feedback, and manage your apps.
Little Scholar Tech Specs
Screen size: 8-inch screen
Screen resolution: 1024 x 768 pixels
Display: Thin film transistor active matrix liquid-crystal display
OS: Google Android™ 4.2.2
CPU: 1.2 GHz dual-core ARM Cortex-A9
GPU: PowerVR SGX540
Storage: 8GB – Micro SD cards compatible up to 32GB
RAM: 1024MB DDR3
Camera: 300KP front / 2MP back
Wi-Fi: 802.11 b/g/n (built-in)
Audio: Built-in mono speaker
Connectors: 1 micro USB 2.0 port, 1 Micro SD card slot, 1 headphone jack, 1 DC port, 1 Mini HDMI port
Bluetooth® Version: 4.0
Battery: Lithium battery (included) – 5000mAh, 3.7V
Adaptor: Input: 100V – 240V ~ 50 / 60Hz 0.4A
Output: 5V 2A
Battery life: 7 hours (average)
Dimensions: 221 x 155 x 12 mm
Weight: 470 g/1lb 6oz
Language: English
For Kids
The kids will enjoy working with the apps, learning how to spell, learning math, singing along, and playing games. My son, who works with children in the age range of Little Scholar users, took the Little Scholar to work as a favor to me to see how the kids liked it. They loved it! A word of caution, though, the Little Scholar tablet is not a toy nor is it an “electronic babysitter.” It’s a piece of computing equipment that I’d suggest being used only with some supervision.
The Little Scholar does have a protective, rubberized case on the back but the front (screen) is still vulnerable to drops, scratches, and accidental foot-in-the-screen incidents. The tablet isn’t fragile or delicate but does require some care to prevent annihilation from careless handling. Just be close by during its use and you should have no problems.
Why it’s frugal: If you just look at the $199.99 price, it doesn’t seem frugal. But if you look at the Little Scholar as a learning investment, it’s extremely frugal. In fact, for the number of books, videos, songs, and apps, you’d pay much more for any other tablet computer plus the price of the apps. The Little Scholar comes with hundreds of hours of fun and educational material for your child. Additionally, the Little Scholar is made just for little learners. It isn’t simply a tablet computer that you add educational apps to; it’s a learning device and that’s pretty frugal for a mere $200.
Check out the School Zone Little Scholar Flyer for a lot more information on the product and its features.
I like the Little Scholar tablet. I find that the price is appropriate for what you get. It is a well thought out learning tool for young children. With proper care and cleaning, your Little Scholar should last for three years or more. School Zone products are well made and well supported. If your little scholar needs a fun boost or a little extra learn time, the Little Scholar tablet is better than television and the Little Scholar has no commercial interruptions.
Rating: 9.5/10
Recommendation: It might be the best $200 you ever spend on your child’s education.
The Jackery Bar – portable power source (Review)
 The Jackery Bar – Black version
Jackery
$29.99 Amazon (Prime)
There are some products that you just have to see to believe and the Jackery Bar is one of those products. It’s very hard to explain but easy to see, once you’ve held one in your hands. The Jackery Bar, in a nutshell, is a small, about the size of 4 AA batteries, case with rechargeable batteries inside that provides you with a source of portable power. I, for one, didn’t understand how powerful or handy this little gadget is until I needed it–or rather until my wife needed it.
My wife and I were at an Oklahoma State University home football game a few weeks ago against Kansas State University. We both usually carry our iPhones with us so that we can text friends and family when OSU scores or pictures of interesting people at the games. On this auspicious day, I didn’t have mine, which annoyed her greatly. She had hers but it was only at 18% power. Someone forgot to plug in her phone.
We needed to communicate with our son after the game to coordinate a dinner meeting with him and his girlfriend. She was afraid that we wouldn’t be able to do that because of my incompetence. I know, right–my incompetence alone.
While messing around with the pockets of my jacket, I noticed extra weight in one. I thought that I had my cell phone in it and as I was about to say that I have it, I pulled out the Jackery Bar.
At first, it took me aback because I had to remember why it was in my jacket. It was there because I went on a so-called photographic expedition a few days before and took it with me in case my digital camera’s battery died on me. It didn’t and I forgot to take the Jackery Bar out of my pocket and put it away. Hey, I’m a guy, I don’t always put my things away as soon as I’m finished with them.
Well, after missing one of the exciting OSU interceptions of the game during my deep thought, I explained to her what had happened. She looked at me unimpressed. Fortunately, she also had her charger with her. I took her phone, her charger, and the fully charged Jackery Bar and connected them all together in one of my pockets.
A couple of hours later, at the end of the game (OSU won!), she skeptically snatched the cell phone from my pocket to see how much power she had left on her iPhone. To her surprise, it was at 100 percent.
She said, “Hey, it worked. What is that thing?”
I had to explain it on our way to my son’s dorm across campus. She said, “Thank you, honey” and grabbed my hand. We chatted happily the rest of the way.
That scenario, as unusual as it sounds, could have gone much differently and normally would have. But the Jackery Bar saved me and possibly my marriage. I guess that might have been a better title to this piece: How the Jackery Bar Saved My Marriage.
Sometimes truth really is stranger than fiction.
The black Jackery Bar was officially announced on September 12, 2013. I’m a little late in getting this review out but it’s totally worth the wait just for the story alone. Below is the official press release about the new product:
Santa Clara, CA (Thursday, September 12th) — Jackery, a provider of premium rechargeable battery products for mobile devices, announced today the launch of a new black version of its popular Jackery Bar portable battery. Jackery’s loyal customer base submitted many requests for a black Jackery Bar to join the silver version and the company’s original distinctive orange.
The black version of the Jackery Bar offers users an additional 120 hours of operational time and is the world’s smallest portable battery with a 2.1A output. Weighing only 5.4 ounces, the Jackery Bar is designed for maximum convenience, giving smartphone and tablet users a reliable and portable power source. Ideal for users that need power and device security, the Jackery Bar is a secured batter with four layers of smart safety protection.
“We introduced a sleek and stylish black color for Jackery Bar in addition to the classic orange and silver colors due to a lot of demand from our customers for the classic black look,” said York Wu, CEO of Jackery. “Jackery Bar offers great looks and power, with a powerful charge that can be on standby for up to six months. Our products embrace both form and function, with a great design aesthetic that is complemented by our extraordinarily powerful portable batteries.”
In addition to iOS and Android devices, Jackery’s products are also compatible with Windows phones, various smartphone and tablet platforms, multiple gaming devices, and MP3 players.
Jackery also features the Air, Giant, and Mini products, each designed to offer portability and power for electronics users.
One of its very cool features is the built-in flashlight. It has a very bright single LED light at one end that you activate with a double press of the power button.
Why it’s frugal: After my personal saga, I shouldn’t have to tell you that its value and frugality are far beyond its price tag. However, for the more practical among you, the Jackery Bar can save you time in that you can charge your device or power it while on the move. You can’t do that any other way. Ordinarily, you have to stop, plug-in, and wait for hours. Charging on the go is worth a lot. Think about the possibilities.
Review: 10/10
Recommendation: For married folks and singles alike, the Jacker Bar is the ultimate in portable power. I won’t guarantee that one will save your marriage but it will save you time and time is money.
Jackery is a Santa Clara, California-based technology company focused on developing premium battery products for smartphones and tablets. The company offers a lineup of two products, the Jackery Bar and Jackery Mini, which both offer considerable charging time and small form factors for owners of the most popular smartphones, tablet devices, MP3 players and gaming devices.
For more information, visit http://www.jackeryusa.com.
The Diamond Multimedia PlugnView Home Monitoring Kit (Review)
 PlugnView Home Monitoring Kit
Live video security camera hardware
Diamond Multimedia
$119.99 Retail/$94.66 Amazon (Prime)
Product Spotlight Video
Like all Diamond Multimedia products, the PlugnView Home Monitoring Kit (PlugnView) is a high quality, low cost product. Diamond succeeds in putting a lot of ‘bang for the buck’ into every one of its devices. And you know that you have a Diamond Multimedia product because it has all the familiar design features: small footprint, abundant ventilation slots, highly visible labels, status lights, attention to details such as furniture-protecting rubber feet, and high impact plastic construction.
Diamond Multimedia (DMM) puts a lot of thought into its products. The PlugnView is standard high quality fare for a DMM product, which is worth noting here.
 Included in the kit is everything you need except the apps, which are available through Apple’s App Store or through Google Play. You get the PlugnView camera, a HP500AV Home Plug Adapter, a Quick Start guide, and a three-foot Ethernet cable.
DMM also has a reputation for making products that are very easy to setup and use. The PlugnView follows that time-honored tradition too.
To setup the PlugnView, attach the Ethernet cable to the HP500AV, plug in the Ethernet cable’s free end directly into an open slot in your router or into an open slot in your network switch, and plug in the HP500AV to electric power. The HP500AV has to access your network via the Ethernet cable and then it attaches to your PlugnView camera via wireless. All three lights should be green, when properly connected.
Plug in the PlugnView camera to electric power and aim it at whatever you want to view. The camera swivels left and right on its base plus you can adjust the vertical (up and down) pitch as well. These adjustments are manual. You can’t move (pan) the camera electronically to scan an area.
Next, download the PlugnView app from the Apple App Store or, if you have an Android device, from the Google Play Store.
Open the app, tap the Plus (+) button to add a camera. On the next screen, select the way you want to add your camera to the app: via QR code on the bottom of the camera, local network search, or manually. I suggest that you attempt to add your camera first by searching. If that doesn’t work, then scan the QR code on the bottom of the PlugnView. Finally, if those two fail, add it manually. But one should work and adding manually is a pain because of the length of the ID and the password. You can change the password later in the app.
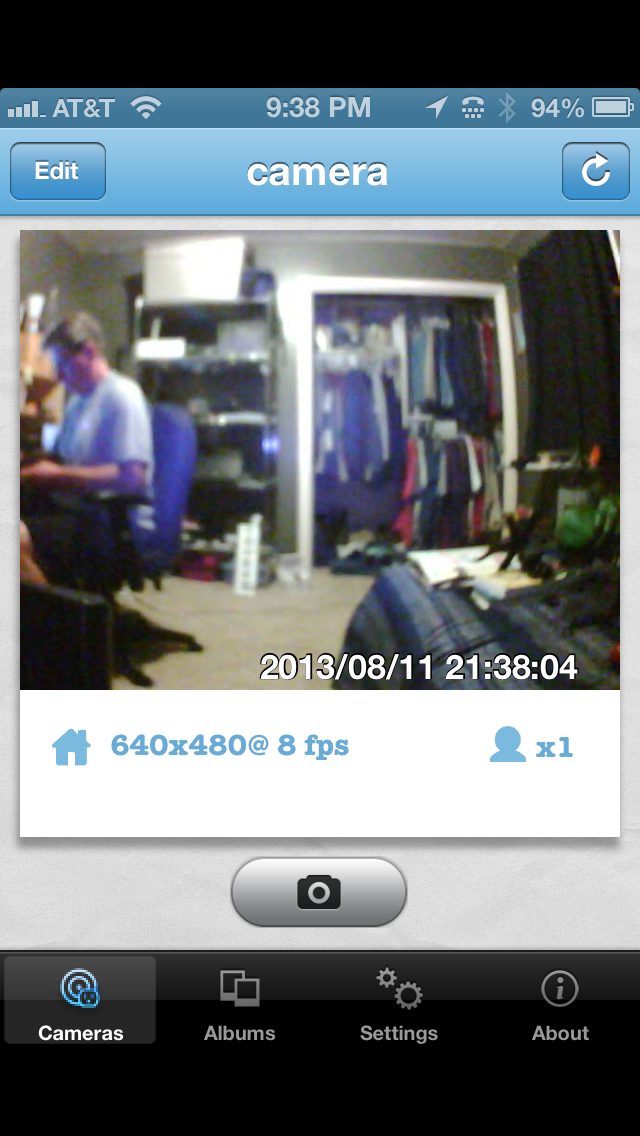
Figure 1: A live video view using the iPhone PlugnView app.
A local network search should find your camera within a few seconds. Once it does, you’ll see the cryptic identification code for your camera. Tap the found camera to edit its properties. Name your camera. I named mine “camera”. Leave the Camera ID as is. Enter the camera password from the bottom of the camera. Be careful to type it in exactly as you see it. Tap Save when done. Tap the Done button when your camera light in the app turns green.
Tap the camera that you just setup. You’ll see a “connecting to camera” message and then in a few seconds, you’ll see what the camera sees. You can also take pictures by tapping the camera icon on the screen. See Figure 1.
If you tap the Edit button (upper left corner), you can change the configuration of your camera, such as enhanced night vision, frame rate, resolution, and a few other details.
I suggest changing the frequency from 60Hz to 50Hz for better viewing inside your home. 60Hz probably works better outside. I also like the highest resolution and best quality picture available. You’ll have to experiment a bit for your surroundings and lighting conditions. Once you change something, tap the Apply button for it to take effect and then evaluate the results.
The PlugnView has pretty good resolution for the cost. Remember that this camera is not high definition video capable. It is what it is, which is an inexpensive, easy to setup, easy to use security camera. If you need something with higher resolution, sound, faster frame capture, and a panning camera, then you’ll have to spend a lot more money. For around $100, I doubt you’ll find anything better.
The PlugnView Home Monitoring Kit will keep you aware of what’s going on inside or outside your home. The PC software that you can download from DMM’s site is quite good. You can monitor multiple cameras at once with it but the app is a quick view used for occasional monitoring from your mobile device.
My overall impression and evaluation of the PlugnView Home Monitoring Kit is favorable. I like the ease of setup, the product quality, and the mobile app combination.
Why it’s frugal: The PlugnView is inexpensive but it’s more than price. If you need a decent quality home security camera, it fits that bill. You have night vision that is quite good, live video, snapshots, and good resolution. It is a good value and a good product.
Review: 8/10
Recommendation: Buy it with an understanding of its limitations and its features.
 Techopedia
- An error has occurred; the feed is probably down. Try again later.
Datamation
- Google and NextEra Strike AI-Powered Grid Deal
- NYT Sues Perplexity AI in Copyright Conflict
- Cloudflare Outage Affects Major Websites
- OpenAI Forces AI to Confess Its Lies
- OpenAI Declares Code Red as Google’s Gemini 3 Threatens ChatGPT
- Coupang Breach Exposes 33.7M South Koreans’ Data
- ChatGPT Celebrates Third Anniversary
- Asahi Group Reveals Findings of Cyberattack
- OpenAI Discloses Mixpanel Security Incident Affecting Some API Users
- Firefox Zero-Day Flaw Exposed 180M Users


You must be logged in to post a comment.