Archive
The iProp Universal Tablet Stand: The Return of the Bean Bag (Review)
 iProp Universal Tablet Stand
iProp
Dockem
$29.99 Retail, $29.99 Amazon (Prime qualified).
When I first heard of the iProp Universal Tablet Stand (iProp), I didn’t know what to think. I have seen other stands and, in fact, I have one that is a bit awkward to use and only works on rigid surfaces. But the iProp is cool in that it can sit comfortably on just about any surface including laps, tables, beds, chairs, floors, and carpet, because it conforms to the surface with its “bean bag” construction. And who doesn’t love bean bag stuff?
The iProp does its job well. In my house, we have iPhones, iPads, and iPad minis and they all work very well with the iProp. My daughter Maria loves the iProp and uses it for reading and working with her iPad mini for everything except video games. Apparently you need to hold the iPad for that.
The iProp has several clever features but our favorite is that you can stash your earbuds and power cable into the zipper pocket for safe keeping and handy access because you don’t want to disturb others while you watch YouTube videos. And you certainly don’t want to run low on power during the all-important Minecraft world creation.
I like to use the iProp to hold my iPad while using my Apple Bluetooth Keyboard. It works much better than the aforementioned rigid stand. I can use the iProp up close and it’s the perfect height to avoid neck strain during my long hours of article writing. The iProp makes writing on the iPad pleasant.
 The iProp currently is available in two colors: Silver (Light Gray) and Black. It is lightweight at just 7.4 ounces and its small footprint (5.9″ x 7.1″ x 5.9″) makes it easy to carry or pack.
Although I’m not sure why, but the plastic tablet rest/holder detaches from the rest of the unit with snaps. Perhaps it does so for convenience if you should need to wash the iProp or for more compact packing. But, in any case, it’s there as an added feature if you should need to separate the two pieces.
The iProp adjusts to minimize glare from your tablet and to accommodate your optimum viewing angle. Just mash it around like you would any bean bag type product until you’re satisfied. You’ll find the iProp stable and comfortable to use no matter how picky you are.
From a quality perspective, the iProp is very well made. I’m impressed with the construction and apparent durability. The product feels good in your hands and is something that you’d be proud to use in public settings such as lunch, bookstores, presentations, seminars, group meetings, or at home. This product will outlast many generations of iPads.
I can honestly recommend the iProp as a phone or tablet accessory. I use it in the kitchen to hold my iPad when I’m on allrecipes.com concocting a new creation for my family.
I love the iProp and so does my daughter who will probably take it to her room and never allow me to touch it again.
 The iProp is frugal because you will only need this one product to hold your tablet or phone, regardless of manufacturer. The iProp is compatible with Apple products, Androids, the Microsoft Surface tablet, and all mobile phones.
Maria’s Review: 10/10
My Review: 9/10
Recommendation: If you need a tablet or phone stand, get the iProp.
Making it Move with MotionComposer for Windows (Review)
 MotionComposer 1.0.14
Aquafadas
$149 US
MotionComposer for Windows
Also available in Mac format.
MotionComposer is a desktop application that allows you to create Flash or HTML5 animations for your website or animated ebooks for iPad and iPhone. MotionComposer is a relatively complex program that has just about every bell and whistle imaginable for creating dynamic content. I like the application. It’s too bad that I’m either not smart enough to create really good content or I haven’t spent enough time with it to do so.
I’m too embarrassed to post my creation for you to see but I can see how easy it is for someone who can spend time with the application to learn its ways and means.
It’s a very powerful program that I would compare to Adobe Photoshop in flexibility, power, capability, support, and complexity. Don’t mistake the application’s complexity for complexity of use. The program is complex but its operation is simple.
The user interface is clean and enjoyable to use. It is responsive and does exactly what you tell it to do. MotionComposer is one of those programs that you could use to create an interactive training device, a dynamic website, an animated ebook, magazines, newspapers or just about any animated digital content that you can imagine. I’d love to have expert knowledge of it but I may never gain that kind of competence with the application on my own.
MotionComposer’s website makes the following claims:
MotionComposer makes your life easy
- No coding required.
- A clear user interface lets you create beautiful animations effortlessly.
- Publish in Flash® and HTML5 in a single step.
- Publish content to any computer, smartphone, and tablet, including iPhone and iPad.
- Optimized HTML5 code ensures the best performance of your content on iPhone and iPad.
I’d have to agree. Even my very poorly conceived animation worked very well. If you’re a graphic artist, designer, web administrator, ebook creator, or creative person in general, you’ll love it. And for $149, it’s easy on the wallet too. Seriously, these types of applications, if you’ve priced them, are far more expensive or you have to purchase add-ons or modules to do what this one does as is.
Creating content with MotionComposer reminds me a bit of creating a stop motion movie. You begin with a timeline and slides. From there, you add graphics or text and edit the transitions and movements of your objects. It’s great fun actually and not anywhere near as tedious as creating a stop motion movie.
The app features multiple transitions for elements, such as text fly-in, transitions between slides, audio capability, zoom and more. If you really want to see it in action, watch the demo video.
I have some good advice for you after working with this application for a few hours. First, if you’re a beginner with this kind of app, read the docs, watch the demo video and learn its capabilities before you experiment. It’s easy but it’s not child’s play. This is a professional application that requires mastery. If you’re a pro who’s coming at this from another similar application or from some other method, you’ll love it.
In all, I think the price plus performance rate this application at a solid 8.5 out of 10 for me. A company representative told me that there is a newer version coming soon that will knock your socks off. Frankly, I never liked socks anyway. I can’t wait. I hope they allow me to upgrade. This is one app that I’d love to master and use.
Rating: 8.5/10
Recommendation: Buy and Learn.
mymosaic App (Product Review)

mymosaic’s Opening Screen
mymosaic App
MindTrip Studios, LLC.
iPhone, iPod and iPad compatible.
$0.99 from the Apple Store
Facebook Page
@mymosaicapp
Since I was a kid, I’ve wanted to make photo mosaics but never had the patience to copy, cut, paste, arrange, repeat. Making mosaic pictures back then is kind of like shooting stop motion videos: the result is so cool but the process is so painful. Well, technology finally caught up with my hedonism/laziness/lack of patience in the form of an iGadget app. Currently, the mymosaic app is only available for Apple products. And for 99 cents, you can’t beat the price.
The two best places to see examples of mymosaic and the creative possibilities are on the mymosaic Facebook page and on the mymosaicapp Twitter feed. There are some OMG photos on there. But don’t be intimidated by them because you too can produce such images with your photos in minutes. Seriously.
You can save your finished mosaics in a variety of sizes while it’s still in the buffer. See the size chart below:
- Mobile – Optimized size for mobile to mobile viewing.
- Small – 10″x10″
- Medium – 20″x20″
- Large – 30″x30″
The Large size gives you the opportunity to save your mosaic in poster size without losing detail.
There’s only one problem with the mymosaic app and I hope MindTrip fixes it because, for me, it’s a major problem. You can only select an entire album instead of individual pictures to create your mosaics. You’ll see what I mean during the following mosaic creation tutorial.
Mosaic creation

Take new photo or select from an album
When you create a new mosaic, either you can take a new photo for the main picture or select one from one of your albums. That part is fine. Step two is to adjust the mosaic options such as number of tiles, color shift, variety, tile consolidation, framed pictures and tile source.
When you select tile source, you’re only given the option of selecting entire albums. I want to be able to select individual pictures for the tiles. What if I want to create a mosaic of my daughter that’s composed of a picture of me and a picture of my wife (Get it?)? I would have to empty out my Camera Roll or create a new album and copy the two pictures into it that I want to use. Both options are kind of a pain.
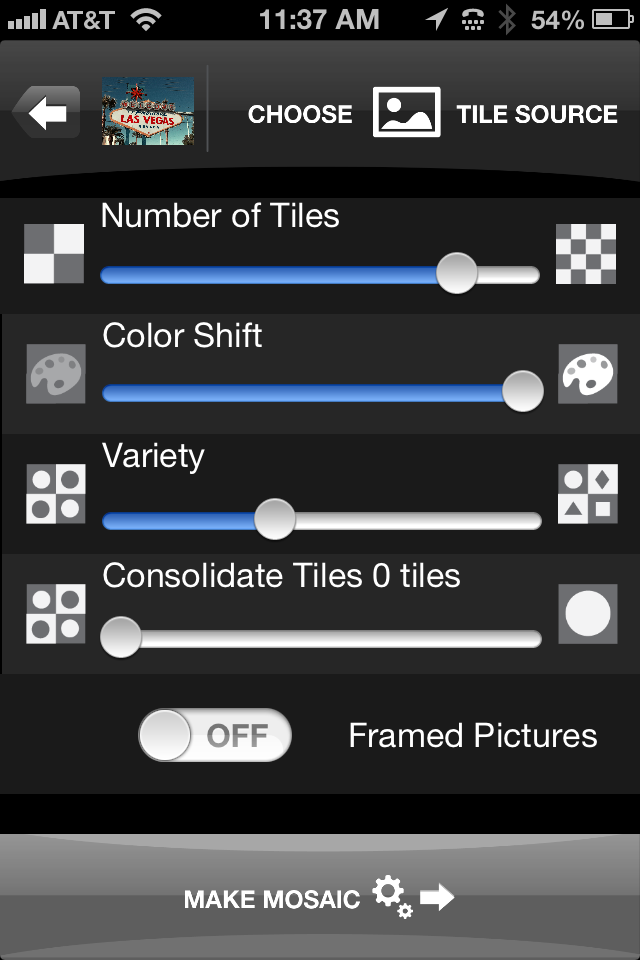
mymosaic’s Option Screen
Once you’ve selected your album, you tap Done to return to the options page and tap Make Mosaic. Your finished mosaic appears ready for you to save to your Camera Roll or to share on Twitter, Tumblr, Facebook or Flickr.
If you don’t like the way your mosaic looks, you can tap the back arrow and adjust your options and recreate the mosaic by tapping Make Mosaic again. You don’t have to recreate it from scratch, since the app holds your source photo and album in a buffer.
You won’t lose the mosaic you’re working on unless you return to the main screen where you select to take a new picture or select one from an album.
The mymosaic app is easy to use and a lot of fun to experiment with. I’ve sent some of my mosaics to Wal-Mart‘s photo lab to be printed and they look very cool. It’s a great way to see your handiwork in a short period of time, since most cities have a Wal-Mart with a short turn-around time photo lab. You can load your pictures into their website and pick up your printed pictures in about two hours.
I really like mymosaic. It’s the app I’ve looked for to create the effect that I’ve longed for: photo mosaics. Below, you can see a mosaic that I quickly created during the writing of this review. The original is a store mannequin that I shot while in Las Vegas at a conference. I took the picture with the Old Camera App and I think it looks quite cool. Click on the photos to see them in full size.
You can mix and match your mosaics too. You can use a source B&W photo and use color photos to create the mosaic or vice versa. The colors will be muted but the effect is still very intriguing.
Have fun with mymosaic. I highly recommend that you buy this app if you want to experiment with mosaics. It’s the most creative fun you can have for 99 cents.
Review rating: 8/10

Original mannequin shot in black and white.
Mosaic using original photo as tile source.
 Techopedia
- An error has occurred; the feed is probably down. Try again later.
Datamation
- Google and NextEra Strike AI-Powered Grid Deal
- NYT Sues Perplexity AI in Copyright Conflict
- Cloudflare Outage Affects Major Websites
- OpenAI Forces AI to Confess Its Lies
- OpenAI Declares Code Red as Google’s Gemini 3 Threatens ChatGPT
- Coupang Breach Exposes 33.7M South Koreans’ Data
- ChatGPT Celebrates Third Anniversary
- Asahi Group Reveals Findings of Cyberattack
- OpenAI Discloses Mixpanel Security Incident Affecting Some API Users
- Firefox Zero-Day Flaw Exposed 180M Users


You must be logged in to post a comment.