Archive
Nyrius ARIES PRO Wireless HD Transmitter for Laptops (Review)
 ARIES PRO Wireless HD Transmitter (NPCS550)
Nyrius
$249.99 Amazon (Prime)
Uncompressed streaming of 3D video at 1080p from computer to TV up to 160 feet away.
I didn’t know quite what to think of this product just from its description but once I saw it in action, I decided that I’m a Nyrius convert. I know it might sound funny to say it but I’ve wanted a product like this for a long time–at least for the past five years. The Nyrius ARIES PRO Wireless HDMI Transmitter for Laptops consists of a wireless transmitter that you insert into a laptop (or other computer) via its USB and HDMI interfaces and an HDMI receiver that connects to your TV’s HDMI interface. The receiver also plugs into a power outlet. And as if by magic, the two units connect and your computer’s screen is streamed to your TV. Seriously.
The reason that I’ve waited so long for this can be summed up in a single word: Netflix. Several years ago, we purchased a Netflix subscription from which we ordered physical DVD movies, three at a time, that were delivered to our home. After watching the movies, we returned them.
Well, as you know, Netflix started offering streaming movies via the Internet. We didn’t have a TV capable of receiving Netflix, so we had to opt for one or more of the following as options:
1. The Netflix Channel on our Nintendo Wii.
2. A laptop wired to our TV.
3. DVDs mailed to our house, which we also had to mail back.
None of those options were/are that great.
 The Nyrius ARIES PRO Wireless HD Transmitter (ARIES PRO) takes care of that problem. But the service doesn’t just stop at Netflix. I can stream anything to the TV that I have on my laptop, which includes movies, TV shows, computer applications, presentations, and even Skype conversations.
I used to have what was called a “TVator” that consisted of wires and hookups that worked very well back in the 1990s. It was very cool. A wireless setup would have been (And is) much better.
 For presentations, I’m not limited to where I am in a room. I don’t have to stand in some cumbersome place and have the people in the room shuffle around to see the screen. I’m totally out of the way. In fact, I don’t even have to be in the room. I could be at my desk giving the presentation to the conference room up to 160 feet away. That’s handy for when I need to record a presentation as well as present one at the same time. Being able to do it remotely cuts down on all of the ambient room noise: coughing, shuffling, random comments, etc.
Now, I understand that this product is meant for streaming TV, movies, and video games from your computer to a TV screen but come on, that’s way too limiting for someone who needs this product for less esoteric use.
What you get for $249.99:
- Digital Wireless HD Transmitter
- Digital Wireless HD Receiver
- Velcro strips
- External IR Receiver
- Velcro Strips
- 100-240V AC Power Adapter
- 5 ft HDMI Cable
- Right Angle HDMI Adapter
- USB Power Cable
- Female USB Adapter
- 1 Year Warranty
- Lifetime Live Customer Support
Why it’s frugal: The ARIES PRO product is frugal because of its flexibility as a streaming device. If you could only use it as a computer to TV connection for games and movies, it wouldn’t be frugal. But its extended use as a professional presentation tool makes it extremely frugal. You don’t have to buy anything else.
My favorite part of the product is that it just worked. I didn’t have to fuss or tweak anything. In fact, it shocked me that it was so easy to setup. Here are the setup steps from unboxing to video streaming:
- Unbox the product
- Plug in the HDMI cable and power connector to the TV receiver box (the larger one) and then connect that box to your TV and power.
- Change your TV channel to use the HDMI port that you plugged the receiver into.
- Connect the USB cable to the transmitter and then plug in the transmitter to your computer’s HDMI interface and into an open USB interface.
- The two units “find” each other and begin transmitting. If this doesn’t happen automatically, press the button on the transmitter once.
Everything that is now on your computer screen is mirrored on your TV. Magic.
There’s no software to install, no messing around in Control Panel, no calling your brother-in-law the computer expert to help you figure it out. It just works.
The downside of a product like this for home use is that now there are Roku boxes, Chromecast devices, and Apple TV, for streaming movies and TV shows that the need for such a device has diminished somewhat. However, the need for this service has exploded in businesses for training, presentations, software demonstrations, and collaboration. No conference room should be without one. And while $250 for a home setup is a little steep, it’s a great deal for businesses. I guess the old adage is true for the ARIES PRO–when one door closes, another one opens.
For quick, easy setup for conference room computer visualization, I haven’t seen anything better since the TVator. It’s a quality product at a great price point for business use.
Rating: 8/10
Recommendation: Buy it for your business but you probably don’t need it at home.
Keep Your iStuff Stylishly Under Wraps with Mummy Cases (Review)
 Mummy Cases for iPad, iPhone, and iPad mini
Loop Attachment Company
Price: $40.00 for iPad. $24.95 for iPhone. $30.00 for iPad mini.
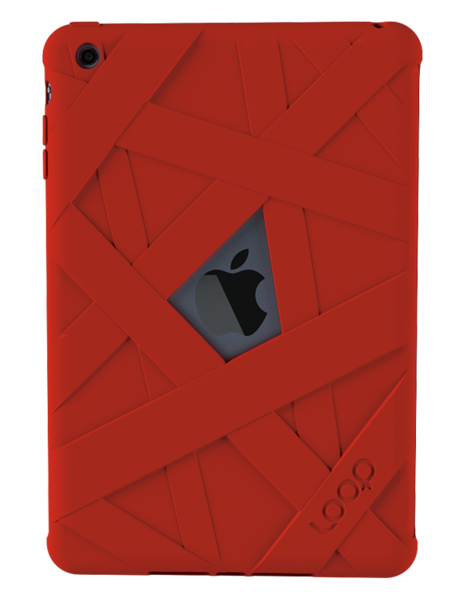
The Mummy cases for your iPad, iPhone, and iPad mini are just what you need for keeping a firm grip on your mobile device, while also keeping a firm grip on your sanity when using your very expensive gadgetry. Mummy cases are called “mummy” because their design is somewhat reminiscent of mummy wrappings. One significant thing to note about the cases is that they do not cover your product’s cameras, speakers, power connector, earbud interface or Apple logo.
I’m not sure the last one is an absolute requirement but some people like for you to know they’re using Apple products instead of some knock off or lesser quality device. Actually, not covering the logo is really a secondary feature–the real feature is so that you can stash your credit cards, your ID, your gym membership card, or even a few business cards.
The cases are constructed of high-quality silicone rubber polymer, which is chemically unreactive, stable, durable, impact absorbing, and shape retaining. It is also highly resistant to changes in temperature and mechanical stress. In other words, this case will likely outlast the electronic device that it protects by a factor of ten.
 And now, my personal experience with the Mummy case for iPhone 5:
Did you ever have one of those days where everything seemed to go wrong? And one of those things was that your iPhone slid off of your car’s dashboard and hit the floorboard hard after, of course, making an impact on your gearshift lever. I’ve had it happen to me more than once. My iPhone 5 has taken a minor beating because of my desire to have it handily placed on the dashboard within reach. No, I don’t text and drive but I do have a Bluetooth enabled car so I can make and receive phone calls by pressing steering wheel buttons and speaking.
The problem is that I can’t send or retrieve messages using the car’s built-in features. I have to physically press my iPhone’s Home button until Siri responds. Once I do that, all is well but it has to be somewhere handy for me to do it. The dashboard is a good choice–well, would be a good choice if it weren’t for the fact that anytime I turn a corner, it skitters across the car like a rock skipping across a lake, with similar results: I get a sinking feeling at the end of the excitement.
After I received a set of Mummy cases to try, I immediately placed one on my iPhone, my iPad, my wife’s iPad mini, and my daughter’s iPad mini.
I decided that because this case is made of silicone rubber I’d try the dashboard trick again. At least it would have enhanced protection even if it failed to hold the phone in place. To my enjoyment, the case held my phone in place on the dashboard, even through the treacherous, construction-laden streets of Tulsa, Oklahoma. Success. Finally, I can leave my phone on the dash, within reach, without having to hold it down or pick it up every time I turn a corner, swerve to miss an errant driver (don’t laugh, it happens a lot), or to navigate the plague of perennial construction.
Let me say here that the silicon rubber isn’t sticky or tacky, like you might suspect. This is high quality silicone rubber and not the low grade stuff that the “wall walker” toys are made of, nor is it composed of rubber that picks up lint and dust from objects that it touches. It also slides easily in and out of jeans pockets but is “sticky” enough to stay inside under unusual circumstances that I often find myself in during backyard activities, garage puttering, or working in the data center on computers. I don’t have to worry about my phone slipping out of my pocket. That’s one less thing to worry about.
Score one for the Mummy iPhone case.
The iPad case is equally “grippy.” I use my iPad in all sorts of unusual scenarios, such as while I’m watercolor painting, while I’m cooking, or while I’m in the hot tub. Hey, don’t judge me; I like my technology close to me where ever I am.
The case feel good in my hands while I’m playing Trigger Fist or Real Racing 3. Yes, I know that I should be writing, learning, or doing something more constructive but come on–I need my down time too. Didn’t you ever watch Star Trek’s “Shore Leave” episode where they said, “…the more complex the mind, the greater the need for the simplicity of play.”? I don’t care what you think, I’m going with that as applying to myself and as justification for playing video games.
My wife and daughter love the Mummy cases too. My wife really likes the fact that the case has magnetic anchors so that her Apple “smart” cover works with it. She did tell me that you have to be somewhat careful with the smart cover when closing it because sometimes the smart cover doesn’t connect fully and sleep the iPad mini. Neither my daughter nor I have a smart cover so I have to take her word for it.
 She’s had nothing but good things to say about the Mummy case and that she really likes how it feels in her hands. She feels like it enhances her iPad mini experience. Before the Mummy case, she only had the smart cover by itself and she said it felt awkward and never comfortable. She’s happier with it now that she has the Mummy case.
My daughter’s experience is similar to my wife’s with her iPad mini. She plays a lot of video games and likes the grip it gives her on the iPad. She says that it feels “natural.” I’d have to agree. That feeling is purely subjective, I realize, but it’s accurate. It feels like the iPad should have been made with this kind of feel. It’s very hard to explain but it feels natural and it doesn’t add any real weight or dimensionality to the device. It’s “natural.”
Why it’s frugal: The Mummy case is a frugal product because it protects your valuable devices. If that weren’t enough, and it certainly could be, you also have the bonus features of a natural feel, smart cover compatibility, and surface stability–such as on a car’s dashboard.
The only issue I have with the Mummy case is the price. It seems a little high to me. I don’t know how much it costs to produce but the products are made in China, which is slightly offputting. I do prefer American made products. If I’m going to pay $25, $30, or $40 for a case, I’d rather have it made in America. I’d feel better about purchasing the cases if they were $10 per item less expensive.
I love quality products. Apparently other members of my family love them too, because they haven’t removed the Mummy cases since we put them on. The cases are easy to put on your devices, yet give them a snug and stable fit.
The Loop Attachment Company manufactures very well made products. I like the range of available colors and the number of devices they support. The cases fit well and protect the devices they’re meant to protect. The cases are elegant, stylish, and make great gifts for yourself or others. And they’re attention getters–I’ve had several people check out my iPhone case from just the look alone. No one ever did that when I sported my TARDIS case. Oh well, not everyone is a Whovian.
My family and I love the Mummy cases and gladly recommend them for your iStuff. The grip, the natural feel, the range of colors, the warranty, and the added features make them a fine addition to your busy, gadget-centered lifestyle.
Rating: 8.5/10
Recommendation: Buy for yourself or for a gift. You’ll be happy with your choice.
Discovering the 3Pod Flashpoint Flat-Folding P5CFH Tripod (Review)
 3Pod Flashpoint Flat-Folding Tripod (P5CFH)
Formal Name: 3Pod P5CFH 8X Carbon Fiber 5 Section FlatFold Tripod with K2 BallHead
Adorama
$149.95*
*This price is currently $199.95 with $50.00 instant rebate savings and free shipping.
There are a few things that you’ll never hear anyone say. One of those things is, “I have plenty of space, so adding another large, three-dimensional object to my overpacked car is fine with me.” You’ll also never hear a professional or prosumer photographer say that “Another 20 pounds of equipment that’s difficult to carry is no problem at all.” Nope, you’ll never hear those words from anyone. You know what you’ll hear from a photographer about the Flashpoint Flat-Folding Tripod? The word “Wow” will be part of what’s said. As for additional words of exclamation, superlatives, and odd sounds of joy–one can only speculate.
I’m still lugging around an old painfully heavy, bulky, noisy–yes, noisy tripod from the thrilling days of yesteryear–or the 1980s as some people call them. Obviously my old clunker is durable but it weighs a ton and only collapses so far. It’s clumsy to carry. It’s clumsy to work with. It is almost impossible to level. And it generally drives me nuts to use it.
So, you ask, why haven’t I bought something newer and better? Well, to this I can only say, it’s a mixture of laziness and of not wanting to spend $300+ for a bang up tripod that is probably not that much better than my old one is. The only part that might be better is that many higher end tripods have bubble levels on them so that leveling is easier. As for weight, forget about it. I don’t want to trade a bulldozer for a tank.

 Adorama, of course, has the answer to my problem. Adorama has just the remedy in its lineup of affordable, lightweight, durable, sturdy, fully adjustable tripods that not only feature built-in bubble levels but they’re also flat when you fold them. Flat, as in two-dimensional. Yes, I know it sounds strange but it’s true. Flat tripods. The flatness aspect goes against everything you know about tripods, doesn’t it?
Well, these beauties fold flat and come with their own carrying cases. The whole thing looks like a soft sided Clarinet case. And it’s about the same weight as a loaded Clarinet case. All cased up, the tripod measures about 15″x7″x2.75″. The case is actually 7″ at one end and approximately 5″ at the other, so it really looks like a Clarinet case and not a tripod at all.
Inside the case, you’ll find the flat-folding tripod base, a K2 hydraulic Ballhead with standard 0.25″ screw mount, a shoulder strap for you shleppers out there, the user’s manual, tools (two hex key wrenches), and a velvet Ballhead cover to protect your bubble level. The case itself is a heavy duty nylon with reinforced double zippers–think expensive luggage style materials here. It also features internal padding and soft material on the inside to prevent damage from accidental drops and random mishaps during packing or traveling.
At its shortest, unextended height, the tripod is a mere 12 inches tall. The Ballhead adds another 14 inches to the height unextended. However, if you need to get down a little closer to the action, you can adjust the tripod legs downward so that the overall height is only 19 inches.
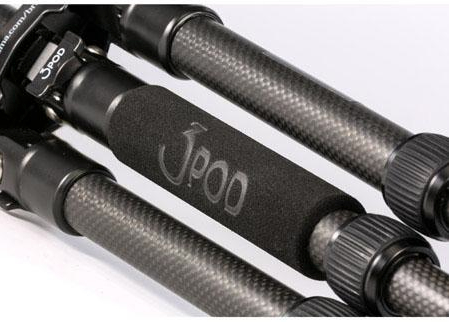 The middle leg of the tripod has this heavy duty padded hand grip on it for easy manipulation and repositioning of the tripod. The Ballhead also has its own carrying strap so that you don’t have to carry the case on location, unless you want to carry it to and unpack at your destination.

Photographers and their assistants will love the quick setup of this tripod. The legs are quick release, quick tighten and have five height selectors. Fully extended Ballhead and leg angles at their maximum, the tripod stands at just over 56 inches, which means that even at my height (6’2″), a mounted camera is at a very comfortable eye level.
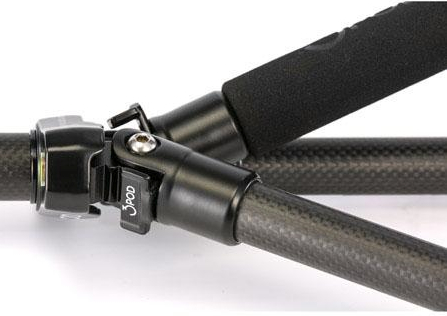 You can position the legs at three different angles and all independent of one another. The same goes for the heights of the extensions. This can provide you with an almost infinite array of possibilities for unusual but stable camera shots. As is suggested by its name, the Ballhead can be used to place your camera at any angle from horizontal to vertical.
The whole assembly is handsome as well as sturdy. The equipment has been tested with camera and accessories at weights up to 20 pounds. That means that your camera, on board flash, umbrella, microphone, lights, or just about anything else you can think of will not be too much for this tripod.
Its strength comes from its carbon fiber construction. In case you don’t know about carbon fiber materials, here’s an excerpt from Wikipedia on the topic:
“The properties of carbon fibers, such as high stiffness, high tensile strength, low weight, high chemical resistance, high temperature tolerance and low thermal expansion, make them very popular in aerospace, civil engineering, military, and motorsports, along with other competition sports. However, they are relatively expensive when compared to similar fibers, such as glass fibers or plastic fibers.”
 The leg releases are easy to use in both directions and the feet are large and padded for added stability. However, if you don’t like the padded feet for use on turf, for example, remove them to reveal spikes. Although you’ll have to use a bit of force, the feet simply pull off, push on–no screwing and unscrewing.
The tripod also features a compass, 360-degree head rotation, two levels, and a removable quick-release plate with universal mounting screw.
This tripod does everything but snap the picture for you. Knowing Adorama, they probably have an accessory for that as well.
I consider this tripod to be for outdoors and for travel. It’s weight and capacity dictate that it will work well under just about any condition or application. Location photographers and filmmakers will like this little tripod. No, it’s not suited for large equipment but you really wouldn’t expect it to be for under $150, now would you?
Carbon fiber is well-suited to more extremes than any of your other equipment so don’t worry about environmental conditions causing you any problems at all.
The only problem I found with this tripod is actually one of its features: weight. I know what I said about weight earlier but the problem is that this tripod is so light that your camera is going to be a bit top heavy, which becomes more obvious when the tripod is fully extended. This won’t be a problem unless conditions are breezy. Then it gets a little “iffy.” It might be fine but I’m just too paranoid to let go, walk away and use a wireless remote in anything but a gentle breeze.
That said, you can adjust the legs to give a wider stance and provide more stability even in fairly high winds. It’s just a word of caution mostly to let you know that this is not a 30 or 40 pound beast that will withstand windy conditions. Additionally, the compass seems not to be great. I’d either leave it off or upgrade it a bit to be really useful.
The 3Pod P5CFH flat-folding tripod is a well-constructed, well thought out, versatile tripod that’s easy to travel with and easy to carry.
Why it’s frugal: If you have a need for multiple tripods in your travels, this one could cut that need down to just one. Frugal doesn’t always mean dollars saved but can also mean space, weight, and pain on those long walks to distance locations.
Rating: 8.5/10
Recommendation: If you need a light duty, durable, versatile tripod, this one is very good. Buy it but stay out of the wind.
Cuddle up to your iPad with a Snugg case (Product Review)
 Snugg Case for iPad
The Snugg
$29.99
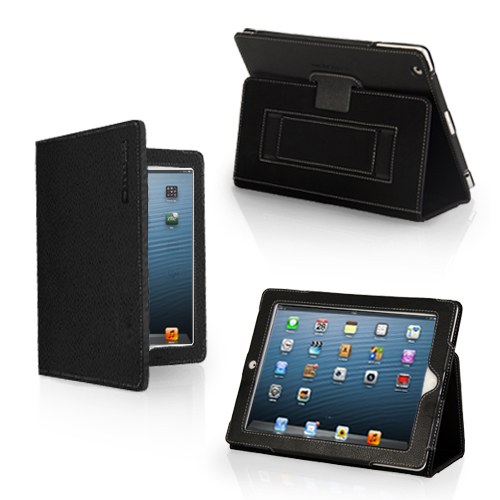
I’ve seen a lot of cases for iPad. I’ve seen ones that claim to do everything but wash your car. The Snugg case for iPad doesn’t make any high and mighty promises. It just does what it does. And it does it elegantly. You’ll never be embarrassed to pull out your iPad with this case on it. In fact, I’d be surprised if you don’t have someone approach you to ask what kind of case it is, where you bought it and how much it cost.
It’s a beautiful leather case that protects your iPad with a look that’s appropriate for even the most conservative office or location. It’s modern, functional, beautiful and crazily affordable. At $30, who can argue?
The only drawback to the Snugg case, and it’s a pretty minor one, is that it doesn’t prop up well on your lap. It tends to not stay up. That said, the case works perfectly on tables, pillow desks, and other fairly rigid surfaces. The upside is that it’s light enough to ignore that one shortcoming. You’ll hardly notice the weight while holding it.
My favorite features of The Snugg are its light weight and its rich feel. My iPad feels secure. It should feel secure because of the Snugg’s velcro latch and “snug” fit. The Snugg feels good in my hands. The Snugg also has some subtle features that you’ll like too. For example, it has magnetic closures, so when you close the flap your iPad goes to sleep. That saves your battery. It’s a good thing.
As you can see from the pictures, you can prop up your iPad in a variety of ways and rest assured of the case’s stability.
All of your controls and cameras are available to you with the case on so there’s no need to slip out of it to do whatever it is that you need to do with a naked iPad. Your fully clothed iPad can do it all but also maintain a very high level of protection and physical beauty while doing it.
The Snugg features a handy and sturdy stylus loop located at the top or left side of the case, depending on how you’re holding it. It also features a hand strap. I don’t really use the hand strap as a hand strap. I use mine as a place to stash all kinds of miscellany from business cards to receipts to my iPhone. Don’t worry, the strap, like everything else on the Snugg case, is very sturdy and well made.
And that’s the first thing you’ll notice when unboxing the Snugg case is its beautiful, quality construction. For $30 these days, I don’t expect much. I should but I don’t. However, The Snugg raises the bar on value for me.
Why it’s frugal: As I’ve written, $30 for a quality leather case that’s light, well-made, elegant, and protects your iPad. How much more frugal do you want? It’s a great value and a great product. Plus, the Snugg comes with the Snugg Promise and a Lifetime Guarantee. Frugality at its finest.
I really like the Snugg case for iPad. It’s my “go to” case for home, travel, gaming, and general use.
Rating: 9.5/10
Recommendation: The Snugg, in my opinion, is a bargain at $29.99. Buy it. You’ll love it.
2X ApplicationServer XG version 11 (Review)
 2X ApplicationServer XG version 11
2X Software
The 2X ApplicationServer is an application and desktop delivery system, similar to Citrix XenApp or Microsoft’s App-V and RemoteApp solutions.
Pricing: $75/concurrent user/1 year subscription; $93/concurrent user/2 year subscription; $109/concurrent user/3 year subscription. Licensing available in 15 user packs. Support at various levels available at additional cost.
If you’re thinking of using Citrix, or some other product, to deliver virtual desktops or applications to your users, you should hold off until you read this review of the 2X ApplicationServer XG (XG) version 11. XG is a complete Citrix alternative for desktop and application delivery.
It’s rare for me to give such high marks to any product that I review but I really like the 2X ApplicationServer. XG is easy to install, setup, and manage. It supports a wide range of clients and the price is attractive to small and medium-sized businesses. The price is a real treat for larger companies too.
I first looked at the 2X ApplicationServer in 2011 over at Linux Magazine (now defunct), where I showed readers how to connect Linux clients to its published applications via Linux clients.
For this review, I focus mostly on application publishing because to write extensively on every aspect of XG would require that you read 50 or more pages of material. For that level of detail, you can read the product manual. This review is an independent assessment of the product, its features, its pricing, its licensing, and my overall impressions.
I’ve recommended the 2X ApplicationServer product to clients, colleagues, and associates in the past, and I’ve never had anything but praise for the product–especially its extreme ease of use and speed of setup.
Download and Installation
The first thing you need to do is to download XG. You have to fill out the online form to receive your free license key for the product. The evaluation license provides you with the capability of testing 25 concurrent users for two terminal servers or virtual hosts. You can also manage ten devices with the 2X ClientManager application.
After the initial 30 day trial, the software scales back to three concurrent users and three devices for the ClientManager.
The XG download is approximately 95MB and is delivered in the form of a Windows MSI file. Once you download the 2X ApplicationServer XG installer file, double-click it to begin installation. Click through the install wizard, accept the license agreement, and allow the program to install to your system.
The only prerequisite for your XG host system is that it must be configured as a Terminal Server or that you have a Terminal Server available to configure for use with XG.
For my evaluation, I used a Windows Server 2008 R2 Standard Edition on a physical server system. You can install and configure XG on virtual machines. I used a regular server because I already had it setup for another project and it was handy for me. Otherwise, I would have used the virtual machine option.
My server hardware consists of a 2.0GHz dual-core AMD with 4GB RAM and standard SATA II HDD.
The download to completed installation was less than 10 minutes.
Resource Publishing
Publishing an application is quick too. I published Notepad, a classic test application, in less than five minutes. I installed the product and published my first application all without reading a single word of documentation. Try that with any competitive product. Now, for advanced configuration options such as printing, scanning, reporting, and Active Directory integration, I suggest that you read the manual.
But, like all things 2X creates, XG is simple to use, quick to setup, and painless to administer. And the application’s server footprint is extremely small and unobtrusive. The fact that you can run XG on virtual machines proves how lightweight it is.
I like that 2X has setup a menu of sorts for publishing resources. I say resources because you can publish more than just desktops and applications. You can publish applications, folders, desktops, predefined applications, and documents with a few simple clicks.
Predefined applications are applications that you can deploy by simply selecting them from an existing list. Included in the list are control panel applets, network configuration, Windows Explorer, or the Windows desktop as a folder.
Never before has centralized resource publishing been so easy to do.
How to Publish a Resource: Internet Explorer
From anywhere in the 2X Console application, click the Application icon located on the far left of the toolbar. See Figure 1.

Figure 1: The 2X Console.
This launches the Publish New Application Wizard and the first screen you see is the Select Server Type screen where you pick the type of server from which you want to publish your application as shown in Figure 2.
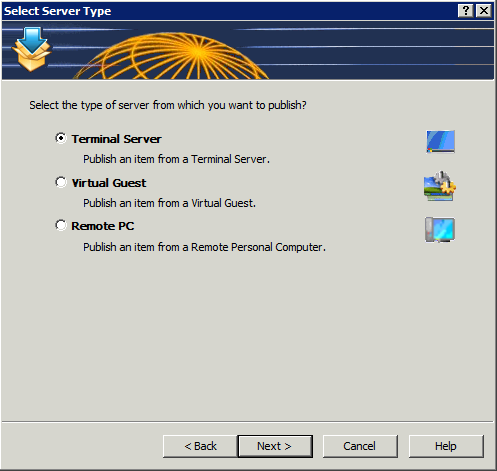
Figure 2: Select the source server type.
I chose Terminal Server because I want to publish Internet Explorer from the local system. Click Next to continue.
Figure 3 prompts you to select the application type to publish: single application, installed application, or predefined application.
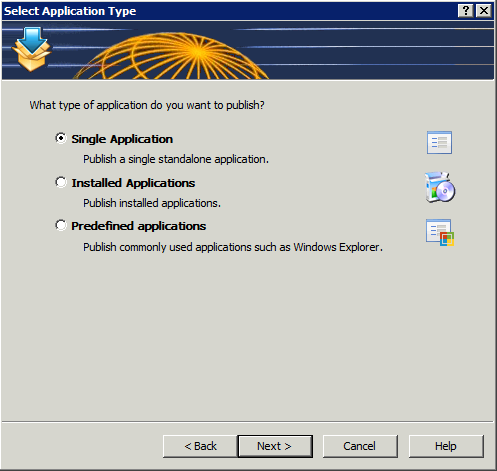
Figure 3: Select the type of application to publish.
I selected Single Application. Click Next to continue.
On this final screen, you’ll give your application a familiar name, select your application (browse to its executable), enter its description, and choose a server from which to run the application. Optionally, you may also select an icon and various application parameters. By default, if you browse to your executable, the optional parameters automatically fill in for you. See Figure 4.

Figure 4: Supply the application details for publishing.
Click Finish to complete the wizard and publish your application. Your published application will appear in the Console window under Published Resources and is ready to be accessed from remote systems that have the 2X client software installed.
Client Access
Download and install the 2X client software appropriate for your device.
Setup the client software to connect to your 2X server by entering an alias (familiar name) for your connection, the server name or IP address of the 2X server, the connection port (default is 80), a username, a password, and the servers “mode.” The mode can be Gateway, Direct, Gateway SSL, or Direct SSL. If you don’t know, try Gateway first. If you aren’t the 2X system administrator, ask the administrator which type you use.
There might be other optional parameters that you can select and tweak but for testing, I suggest leaving everything default. When you’ve finished your client setup, test it by attempting a connection. You should automatically logon to the Windows system and see a list of published resources to which you have access.
Security
Everyone wants to know about security and 2X has it in spades, which means there are so many security options that you can really lock down access to your published resources. For example, in the 2X Console, in the Connection section, you can select domain authentication from the Authentication tab. You can specify the domain, all trusted domains, workgroups, and you can also require authentication before a user can see the list of published resources.
On the Second Level Authentication tab, you specify a provider (Deepnet, SafeNet, or RADIUS) and then you enter exclude list details by IP address, client, or MAC address. Additionally, you can select specific gateway servers to service clients using second level authentication.
If you have a bring your own device (BYOD) program in place but only want to allow certain types of devices to connect to published 2X resources, you can exclude users by the device or client type. For example, if you only want to allow Windows and iOS-based systems to connect, you can exclude all other clients.
There are other security options that you can configure but they require more advanced setup than what I have available to me in my limited lab but I want you to be aware of their existence. You configure groups, 2X client policies, and other options via the Client Manager section of the 2X Console.
Nikolaos Makris, 2X CEO, had this to say about ApplicationServer XG version 11:
“This is a significant release for 2X as it enables businesses of all sizes the ability to scale their virtualization infrastructure according to their organizational demands. We have achieved this through the development of a feature-rich, yet flexible virtual desktop and application delivery solution. Our focus was to provide companies with a cost-effective solution to easily implement and manage a Private Cloud infrastructure. Now that we have released, I’m excited to say that we have achieved our objectives.”
New Features
Sites Management: A farm can be divided into multiple sites with each site representing a single location infrastructure. All sites share the same settings and are isolated. Sites can forward users to other sites if an application or desktop is not available on the current site, if the user is already running sessions on a different site, or if a user is geographically closer to another site.
Role Based Administration: Multiple administrators can modify farm settings at the same time. Different administrators can also have different roles and levels of authority within the system. The settings are stored at the master site, then distributed and activated to the others when the settings are applied. Auditing of who made changes to the system, and when they did so, is also available. If two users try to edit the same object, the second user will find the object locked. If a user adds, edits or deletes an object, the change is shown immediately in the second console. When a user starts the console application they will need to enter their credentials.
Task Menu: The task menu behaves more efficiently when items are selected. On right click in the list control, a context menu can be used. This provides more space for information and makes it easier to add new actions.
Replicate Settings in All Sites: A standard button is used throughout the console so that the same set of settings can be replicated in all sites.
Notifications to Multiple Administrators: Since multiple administrators can be managing the system, it’s possible to send notifications to more than one user depending on the settings used. New types of notification have also been introduced.
Improvements
Start-up Speed of 2X Publishing Agent: When system settings are changed, it has no effect on the agents in use, as the publishing agent will not be restarted but rather it will refresh the actual setting which was effected.
Restructuring of the Console Page: With the addition of Role Based Administration, the console page was structured in a more logical manner, creating a new category for administrator roles.

iPad Client running Internet Explorer and displaying the options menu.
Client Accessibility
You can connect from a wide range of clients to 2X resources. This list is current as of this writing:
- 2X Windows client
- 2X Cloud Portal
- 2X Java client
- 2X Android client
- 2X iOS client
- 2X Linux client
- 2X Mac client
- 2X HTML5 client
- 2X Blackberry client
- 2X Wyse client
- 2XOS client
The range of available clients means that users will be able to connect to published resources regardless of which device they use. This is very good news for companies who participate in BYOD programs.
Why the 2X ApplicationServer XG product is frugal: XG is frugal because of its low barriers to implementation. The pricing is low. The installation and setup are very easy. The management is relatively simple. The security is comfortably high and easy to configure. And you can connect any currently available device to published resources. XG is a lot of bang for the buck and that’s the definition of frugal for me: value.

iPad Client running Internet Explorer and Notepad.
Pricing and Licensing
The 2X ApplicationServer XG is licensed to you as a subscription in one-year, two-year, or three-year increments and by number of concurrent users. The three-year subscription is the most cost effective option at $109 per concurrent user. You have to purchase license packs in increments of 15 users.
The 2X license model is a bit hard to follow. I find it somewhat confusing. The licensing document (link below) attempts to describe several scenarios to help with understanding but the examples aren’t very clear. I don’t understand the expiry terms, upgrade insurance, or the timing when purchasing new licensing.
In my opinion, the licensing could be made simpler. I also don’t really like having to purchase licenses in 15 user increments. But, the license pricing is so good for those 15 that it might matter less to you than purchasing a competitor’s product at a much higher cost. In other words, I can deal with some licensing idiosyncrasies if the numbers are right.
For full pricing and support options, see the 2X Licensing Guide in US Dollars.
Summary
The 2X ApplicationServer XG product can have you up and running published applications in minutes instead of hours or days. You need little to no training to install, setup, publish, and manage a 2X ApplicationServer system.
The price is low enough to where even the smallest companies with the tightest budgets can withstand its pricing model.
And for those really tight budgets, just about anyone with very little training can setup and manage the XG product. For those who don’t want a full-time IT person on staff, you could hire someone to take care of your needs remotely. Publishing an application is so quick an easy that your support costs should be minimal as well.
For my money, the 2X ApplicationServer XG product is the most cost-effective and simplest application and desktop delivery product on the market.
My assessment on a 10-point scale, with 1 being low and 10 being high:
Ease of installation: 10
Speed of installation: 10
Easy to publish resources: 10
Easy to access published resources from remote clients (Windows, Linux, Mac, tablets): 10
License Model: 7
Price/Licensing: 10
Support options: 10
Security options: 10
Client accessibility: 10
You can also check out my ZDNet version of this review.
Listening to myself: Eskuché Headphones (Review)
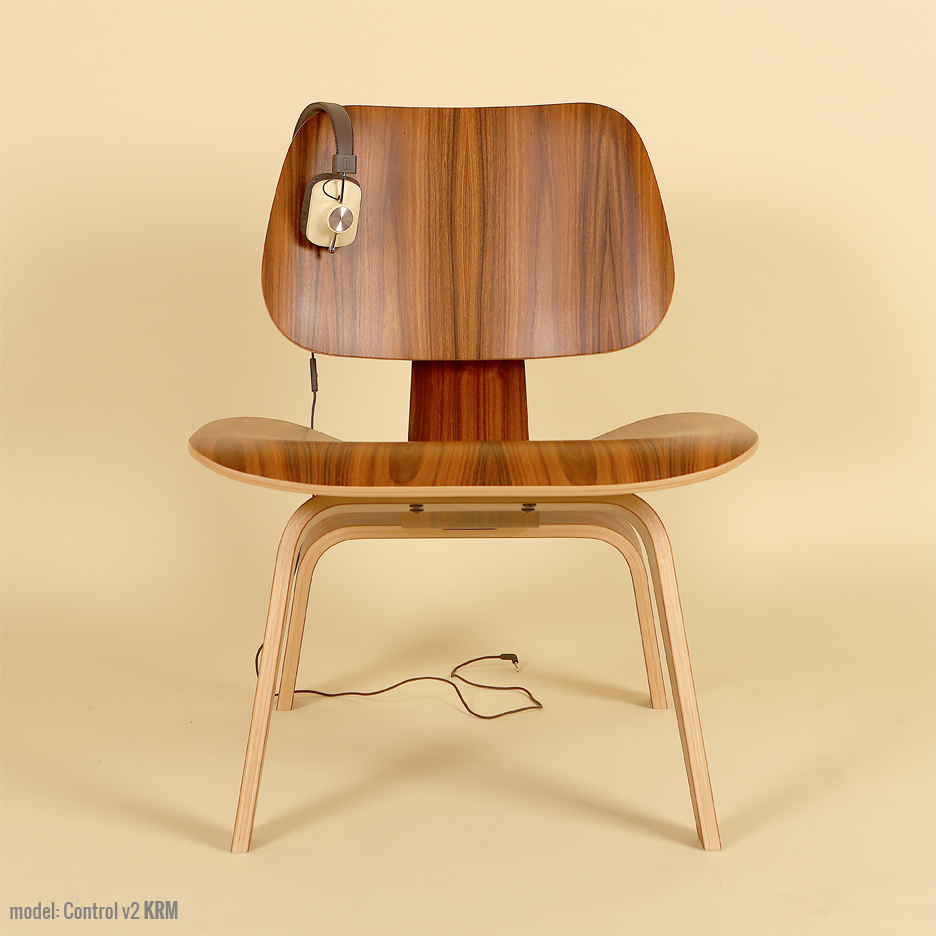
 Eskuché Control V2 Headphones
Eskuché
$59.95
Classic Design * Modern Sound
There’s something seductive about any product that is based on a classic style. Whether it’s furniture, cars, clothes, or headphones, there’s something special in those updated retro designs. That’s what you’ll find with the Control V2 lineup of Eskuché (es-koo-chay) headphones. It’s also cool that they have an exotic sounding name. I wasn’t exactly sure how to pronounce Eskuché until I saw the phonetic helper that I’ve also provided for you.
But, it doesn’t matter how the name sounds, it matters how the product sounds and this one sounds like professional-quality to me.
The padded earpieces filter out all but the loudest of external noises. Even on lower volumes, I have to remove the headset to hear what someone is saying to me. The headband is also padded for greater comfort. The cord that attaches to your computer or other device is a soft, braided one instead of a rubber-coated one. Being soft and braided means that it won’t catch on other rubber-coated cords or get tangled easily. The cord is also far more forgiving than the rubber-coated ones. It moves as you do. There’s no stiffness to it.
Beyond the retro styling, the Eskuché Control V2 headphones are an excellent piece of audio workmanship. The sound is clear and crisp with no fuzziness that you sometimes get with ear-covering ear cups.
For you audiophiles, here’s the technical data:
Driver diameter: 40mm
Impedance: 32Ω
Frequency response: 20Hz-20kHz
Input plug diameter: 3.5mm
The headset also has a 3-button control microphone on it. Upon casual use, I didn’t notice this feature, which means that I’ve unknowingly embarrassed myself multiple times over the past week or so. I make a lot of Skype calls and I have an external microphone for those calls. I assumed, incorrectly, that this headset was just a headset and not also a microphone.
I wondered why my recorder was still responding to my extraneous noises when my microphone was muted–it has a blinking light when on mute, so there’s no doubt. After having a couple of people pause during a conversation and a “Bless you,” I figured it out and fixed the problem. I went back through my recent calls to find out just how obnoxious I’ve been and it’s not as bad as I’d thought. Still, I should have read the box a bit before plugging in and assuming all would be OK. Totally my fault but be warned that the headset has a built-in microphone. Be sure that your devices are setup to use the correct input and output so that you don’t have the same problem.
The pair that I reviewed are a very 1970s burnt orange color. There are other colors from which to choose: Light blue, chocolate brown, and cream.
 I like the colors, but if you’re really going retro, there’s another list of colors that should have been used that include burnt orange: Avocado green, coppertone, harvest gold, and that loud red color that some called “Poppy.” If you’re going retro, you’ve got to go all the way.
The headset also has a music player button on the same control as the volume up/down for the microphone. If you’re using an Apple device and you press it, your music app launches and begins to play. You can also use that button for answering/hanging up your phone.
Why it’s Frugal: The Eskuché is frugal because the headset is quality made down to the 90° (right angle) input jack, so that the wire doesn’t become weak and worn. The frugality comes from being able to use a device for a period of time that offsets its cost. In other words, if you could only use the headset for three months, it wouldn’t be worth the price. Three years or more is a different story.
In all, the Eskuché headset is excellent. I really enjoy using the headset, especially now that I’ve discovered all of its features. The headset is well made, lightweight, durable and well worth the $60 price tag. If you’re an avid musicphile, you’ll love the great sound. If you’re a casual user, you’ll love that cool hipster, retro look. You’ll also like that soft cord that stays out of your way and untangled. If you’re a podcaster or audio editor, you’ll enjoy the comfort of the headset. Sometimes I forget that I have it on–honestly.
If there’s an Apple store or a Best Buy near you, I suggest that you go and try out the Eskuché headset for yourself. There’s no amount of discussion that can match your own experience. I’ve used a lot of headsets of every shape and description and I really like this one.
Rating: 9/10
Recommendation: Go try them out for yourself and listen to the sound quality. Don’t forget to look in a mirror to see how cool you look.
Try Shuttr by Muku Labs for redefined selfies and sneakies (Review)
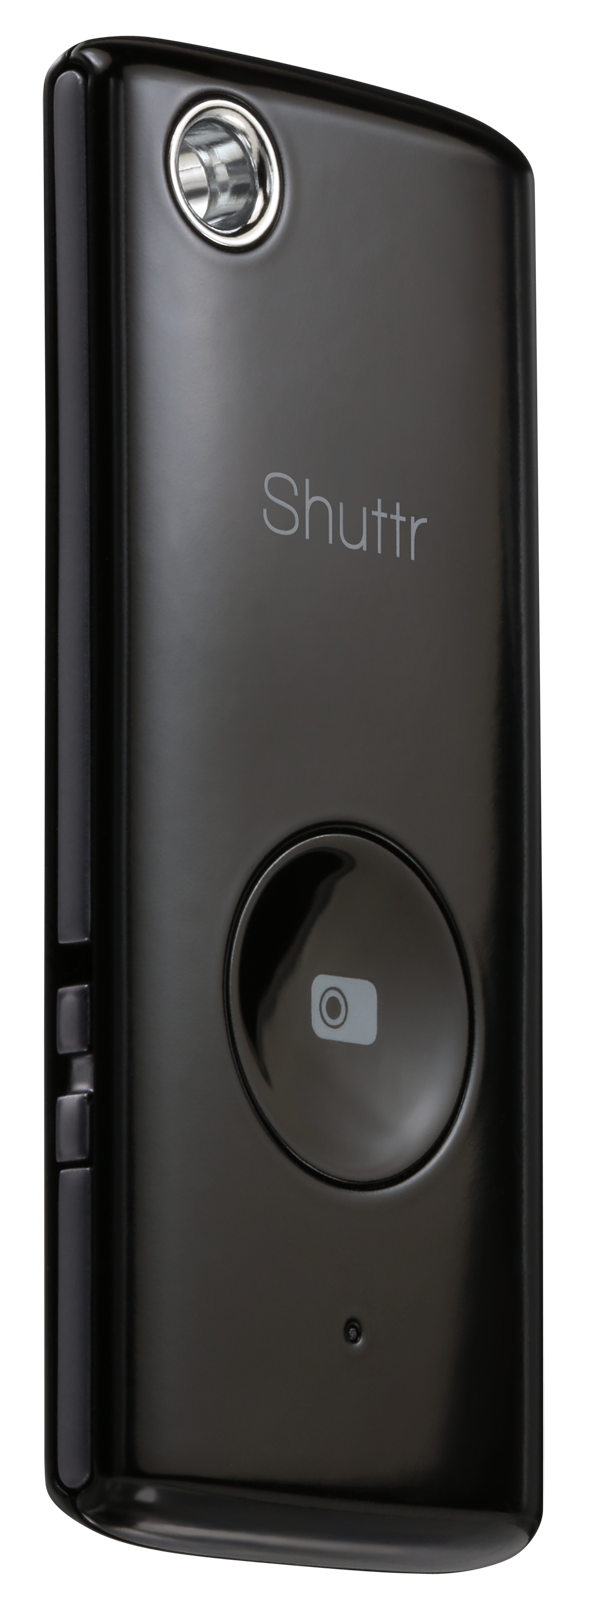
 Shuttr, Remote Shutter Release
Muku Labs
$39.99
Compatible with iOS5+, Samsung Galaxy S3/S4/Note 2/3/10.1/ and Nexus 4/7
Dimensions: 2.2 x 0.2 x 1 inches
Weight: 2 ounces
Attention avid Phoneographers! I’m not going to make you wait for the punch line on this one. The Muku Labs’ Shuttr, remote shutter release, is exactly what I’ve been looking for–for a very long time. I love it! I love my iPhone 5 too. It takes great photos. But, it has one limitation–the same limitation as all phone cameras, and cameras in general–it’s awkward to take remote pictures with.
Sure, you can prop it up or use a phone tripod and set the timer but are you really getting the picture you want with a timer? It’s a rare occurrence, if you do.
With the Shuttr, you can use the handy included phone stand or use some other method of planting your phone far enough away from yourself that you don’t look distorted like you’re looking through some psycho’s eyes in a horror movie.
Or, my favorite thing to do with the Shuttr–place my phone around and take candid shots on demand. And as many as I want to take. No silly app and no timer. Just press, press, press as much as you want to grab those stills or to start and pause video.
The Shuttr works great with the standard iPhone‘s native camera app in still or video mode. But what about other apps?
Here’s the list I’ve tested with and my results (iPhone 5, iOS 7.3):
(In no particular order)
| Camera | Yes |
| Camera+ | Yes |
| Old Camera | No |
| Sepia Camera | No |
| Old Movie | No |
| Cameo | No |
| Cartoonmatic | No |
| Retro Camera | No |
| 360 | No |
| Hipstamatic | Yes |
| Fisheye Cam | Yes |
| Cam Studio+ | No |
| Super Pop Cam | No |
| Pixlromatic | Yes |
| Popstamatic | Yes |
| iDarkroom | Yes |
| Camera360 | Yes |
| Paper Camera/td> | No |
| Duomatic | Yes |
| More Lomo | No |
| SlowShutter | Yes |
| Leme Cam | No |
| TtV Camera | Yes |
| Top Camera Lite | No |
| CrossProcess | Yes |
| Otaku Camera | No |
| Big Lens | Yes |
| Diptic | Yes |
| Orange Cam | No |
| ShakeItPhoto | Yes |
| Momentage | No |
| Momentsia | No |
| Fixel | No |
| Vintagio | Yes |
| Rawporter | Yes |
| Ustream | No |
Your mileage, of course, may vary. I think some of my problems were due to iOS 7 and not Shuttr. Although, I did notice that the apps that work use the basic Camera app and simply apply filters or effects after the fact. So, chances are that if your camera app uses the built-in, generic Camera app, then Shuttr will likely work.
Shuttr is small enough to fit on your keychain and lightweight enough to take anywhere. I love the Muku Labs Shuttr. It’s one of the best smart phone and tablet accessories that I’ve seen. It feels durable and well made. You can also replace the battery when it gets weak or dies. This is not a throw away device.
Apparently I’m not alone in my praise of the Shuttr. There’s a lot of love for it out there. Every major blog and gadget site has sung its praises and it has all five star reviews on Amazon. You can add mine to that.
The Shuttr comes in either black or white and includes a soft carrying pouch and stand. If the $40 price tag seems high to you, then try to find something else that does the same thing. I hadn’t found anything like it and I receive daily emails from Photojojo.
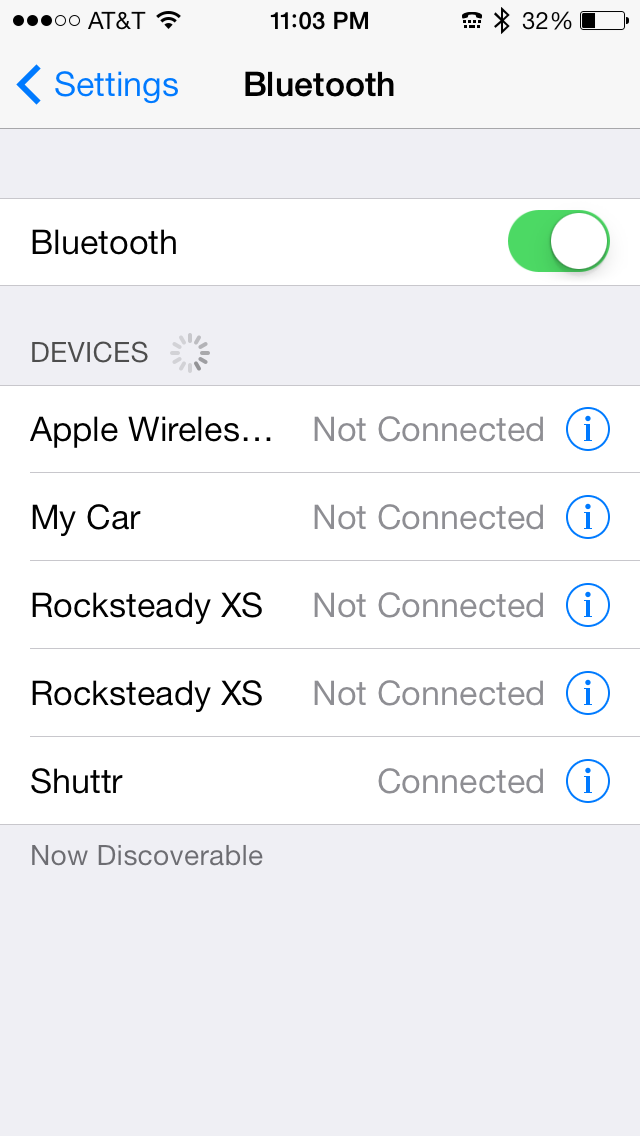 You connect it via Bluetooth by turning on the Shuttr, opening your Settings, opening Bluetooth settings, and then discovering the Shuttr. Tap the Shuttr listing to pair it. You’re done and the Shuttr is ready to use.
Why it’s frugal: The Shuttr is an essential device if you’re a real Phoneographer–seriously. You should have one. I haven’t found anything that comes close to it at any price, so for me, it’s the most valuable photographic accessory that I have. Its value as a must-have accessory makes it frugal.
Of all the iPhone accessories I’ve played with and used, the Shuttr is one that I’ll always have with me. I might forget my tripod, a USB disk, an EyeFi card, or even my car keys, but you can be sure that I’ll never forget this little gem.
Review: 10/10
Recommendation: Definitely buy it.
The Jackery Bar – portable power source (Review)
 The Jackery Bar – Black version
Jackery
$29.99 Amazon (Prime)
There are some products that you just have to see to believe and the Jackery Bar is one of those products. It’s very hard to explain but easy to see, once you’ve held one in your hands. The Jackery Bar, in a nutshell, is a small, about the size of 4 AA batteries, case with rechargeable batteries inside that provides you with a source of portable power. I, for one, didn’t understand how powerful or handy this little gadget is until I needed it–or rather until my wife needed it.
My wife and I were at an Oklahoma State University home football game a few weeks ago against Kansas State University. We both usually carry our iPhones with us so that we can text friends and family when OSU scores or pictures of interesting people at the games. On this auspicious day, I didn’t have mine, which annoyed her greatly. She had hers but it was only at 18% power. Someone forgot to plug in her phone.
We needed to communicate with our son after the game to coordinate a dinner meeting with him and his girlfriend. She was afraid that we wouldn’t be able to do that because of my incompetence. I know, right–my incompetence alone.
While messing around with the pockets of my jacket, I noticed extra weight in one. I thought that I had my cell phone in it and as I was about to say that I have it, I pulled out the Jackery Bar.
At first, it took me aback because I had to remember why it was in my jacket. It was there because I went on a so-called photographic expedition a few days before and took it with me in case my digital camera’s battery died on me. It didn’t and I forgot to take the Jackery Bar out of my pocket and put it away. Hey, I’m a guy, I don’t always put my things away as soon as I’m finished with them.
Well, after missing one of the exciting OSU interceptions of the game during my deep thought, I explained to her what had happened. She looked at me unimpressed. Fortunately, she also had her charger with her. I took her phone, her charger, and the fully charged Jackery Bar and connected them all together in one of my pockets.
A couple of hours later, at the end of the game (OSU won!), she skeptically snatched the cell phone from my pocket to see how much power she had left on her iPhone. To her surprise, it was at 100 percent.
She said, “Hey, it worked. What is that thing?”
I had to explain it on our way to my son’s dorm across campus. She said, “Thank you, honey” and grabbed my hand. We chatted happily the rest of the way.
That scenario, as unusual as it sounds, could have gone much differently and normally would have. But the Jackery Bar saved me and possibly my marriage. I guess that might have been a better title to this piece: How the Jackery Bar Saved My Marriage.
Sometimes truth really is stranger than fiction.
The black Jackery Bar was officially announced on September 12, 2013. I’m a little late in getting this review out but it’s totally worth the wait just for the story alone. Below is the official press release about the new product:
Santa Clara, CA (Thursday, September 12th) — Jackery, a provider of premium rechargeable battery products for mobile devices, announced today the launch of a new black version of its popular Jackery Bar portable battery. Jackery’s loyal customer base submitted many requests for a black Jackery Bar to join the silver version and the company’s original distinctive orange.
The black version of the Jackery Bar offers users an additional 120 hours of operational time and is the world’s smallest portable battery with a 2.1A output. Weighing only 5.4 ounces, the Jackery Bar is designed for maximum convenience, giving smartphone and tablet users a reliable and portable power source. Ideal for users that need power and device security, the Jackery Bar is a secured batter with four layers of smart safety protection.
“We introduced a sleek and stylish black color for Jackery Bar in addition to the classic orange and silver colors due to a lot of demand from our customers for the classic black look,” said York Wu, CEO of Jackery. “Jackery Bar offers great looks and power, with a powerful charge that can be on standby for up to six months. Our products embrace both form and function, with a great design aesthetic that is complemented by our extraordinarily powerful portable batteries.”
In addition to iOS and Android devices, Jackery’s products are also compatible with Windows phones, various smartphone and tablet platforms, multiple gaming devices, and MP3 players.
Jackery also features the Air, Giant, and Mini products, each designed to offer portability and power for electronics users.
One of its very cool features is the built-in flashlight. It has a very bright single LED light at one end that you activate with a double press of the power button.
Why it’s frugal: After my personal saga, I shouldn’t have to tell you that its value and frugality are far beyond its price tag. However, for the more practical among you, the Jackery Bar can save you time in that you can charge your device or power it while on the move. You can’t do that any other way. Ordinarily, you have to stop, plug-in, and wait for hours. Charging on the go is worth a lot. Think about the possibilities.
Review: 10/10
Recommendation: For married folks and singles alike, the Jacker Bar is the ultimate in portable power. I won’t guarantee that one will save your marriage but it will save you time and time is money.
Jackery is a Santa Clara, California-based technology company focused on developing premium battery products for smartphones and tablets. The company offers a lineup of two products, the Jackery Bar and Jackery Mini, which both offer considerable charging time and small form factors for owners of the most popular smartphones, tablet devices, MP3 players and gaming devices.
For more information, visit http://www.jackeryusa.com.
The iHome type pro Bluetooth keyboard case for iPad (Review)
 iHome type pro Bluetooth keyboard case for iPad
iHome, a division of SDI Technologies, LLC.
Office Depot $99.99
You never know just how your day will turn out or change your whole attitude until you wake up and face what may come head on. I follow a simple routine: I wake up, head to the gym, work out, shower, come home, fix breakfast for my daughter, take a deep breath or two, and then head into my office (a five second commute) to start my work day. And I do all that by 7:30 a.m. Some days I ask myself, “What’s my motivation.” Well, on Monday, I received, via UPS delivery, a new motivation: The iHome type pro Bluetooth keyboard case for iPad. Specifically, my iPad 4.
If you think that I’m being dramatic, you’re probably right. After all, why should I be so excited about an iPad keyboard case thingy? That’s what your formerly cynical self tells you about products like this. But having experienced the iHome keyboard case firsthand, I can tell you honestly that it’s one of the most exciting accessories I’ve ever used.
First, the case opens clamshell style to reveal a standard Apple keyboard–better still, an enhanced Apple-style keyboard–that’s right, it’s an Apple-style keyboard, but enhanced–enhanced with the Command key, the Option key, the Control key, and the fn key. It has the standard function keys along the top (F1 through F12), which perform double duty as special iPad device keys.
Now here’s the enhanced part. Those special iPad keys do stuff that you normally have to tap and swipe for–right there on your keyboard. You can close apps by using the Home key. If you press the Home key twice, it has the same effect as double pressing your Home button twice.
![]()
You can change the brightness of your screen with F1/F2, lock/unlock your screen with the F6 key, navigate through your music selections with the F7, F8, and F9 keys, and adjust your sound settings with the F10, F11, and F12 keys. When you need to use your function keys as function keys, press and hold the fn key while pressing the function key that you want to use.
Your iPad fits snuggly into the “screen” area with a couple of simple snaps. You can charge your keyboard case with the included mini USB charger and use it wire free or you can plug it in and use it wired and allow it to charge while you’re using it.
When you close the case, you have a sturdy metal shield on the bottom and a hard plastic cover on the top that creates a protective shell for your keyboard and your iPad. And the whole thing is roughly twice the thickness and just a little larger than your iPad without the keyboard case. The keyboard case feels sturdy too. It feels more like a netbook rather than a tablet plus a keyboard. You can easily carry the combo or slip it into a purse or backpack for easy transport.
I don’t know how long the keyboard’s battery life is because I’ve never had to charge it yet and my iPad has been in the case for several days, switched to the ON position, and not plugged in. I’ve used it quite a bit too. I’ve carried it from room to room, to an outside table, and to the bedroom as a laptop unit used on my ePad pillow desk. I’ve no trouble with it preventing any connectivity to WiFi and have had no issues with the keyboard.
The one exception to its otherwise perfect performance is that it seems that on my iPad, which has iOS 7, three of the keys don’t work–or maybe I should say that I haven’t figured out how to make them work yet. The Internet browser key (F3), the Search key (F4), and the Photos key (F5) have no effect when pressed. I believe it to be an iOS 7 problem because the icons on the keys look like the old symbols for those apps on iOS 6 and previous.
Why it’s frugal: The iHome type pro Bluetooth keyboard case for iPad is frugal because it protects your investment. Spending so much on your iPad means that you need to protect it plus it’s not just a case, you get a top notch keyboard to boot. The Apple Bluetooth keyboard will cost you $69.99 and it can’t be put into a case with your iPad. A great combo at a great price.
I know there are other iPad keyboard/case combos out there but this is the one that I like the best–that’s why you’re seeing it here. The iHome type pro Bluetooth keyboard case for iPad is sturdy, handy, appropriately proportioned for the iPad, attractive, and includes all of the features of an Apple keyboard plus a very nice case rolled into one package. All of your iPad ports remain available while in the case (open or closed) and your mini USB charger port on the keyboard is also exposed for easy connectivity.
Review: 10/10
Recommendation: If you want a sturdy case and a Bluetooth keyboard for your iPad, this is the one to buy.
Recoil: The no cuss, no fuss automatic cord winder (Review)
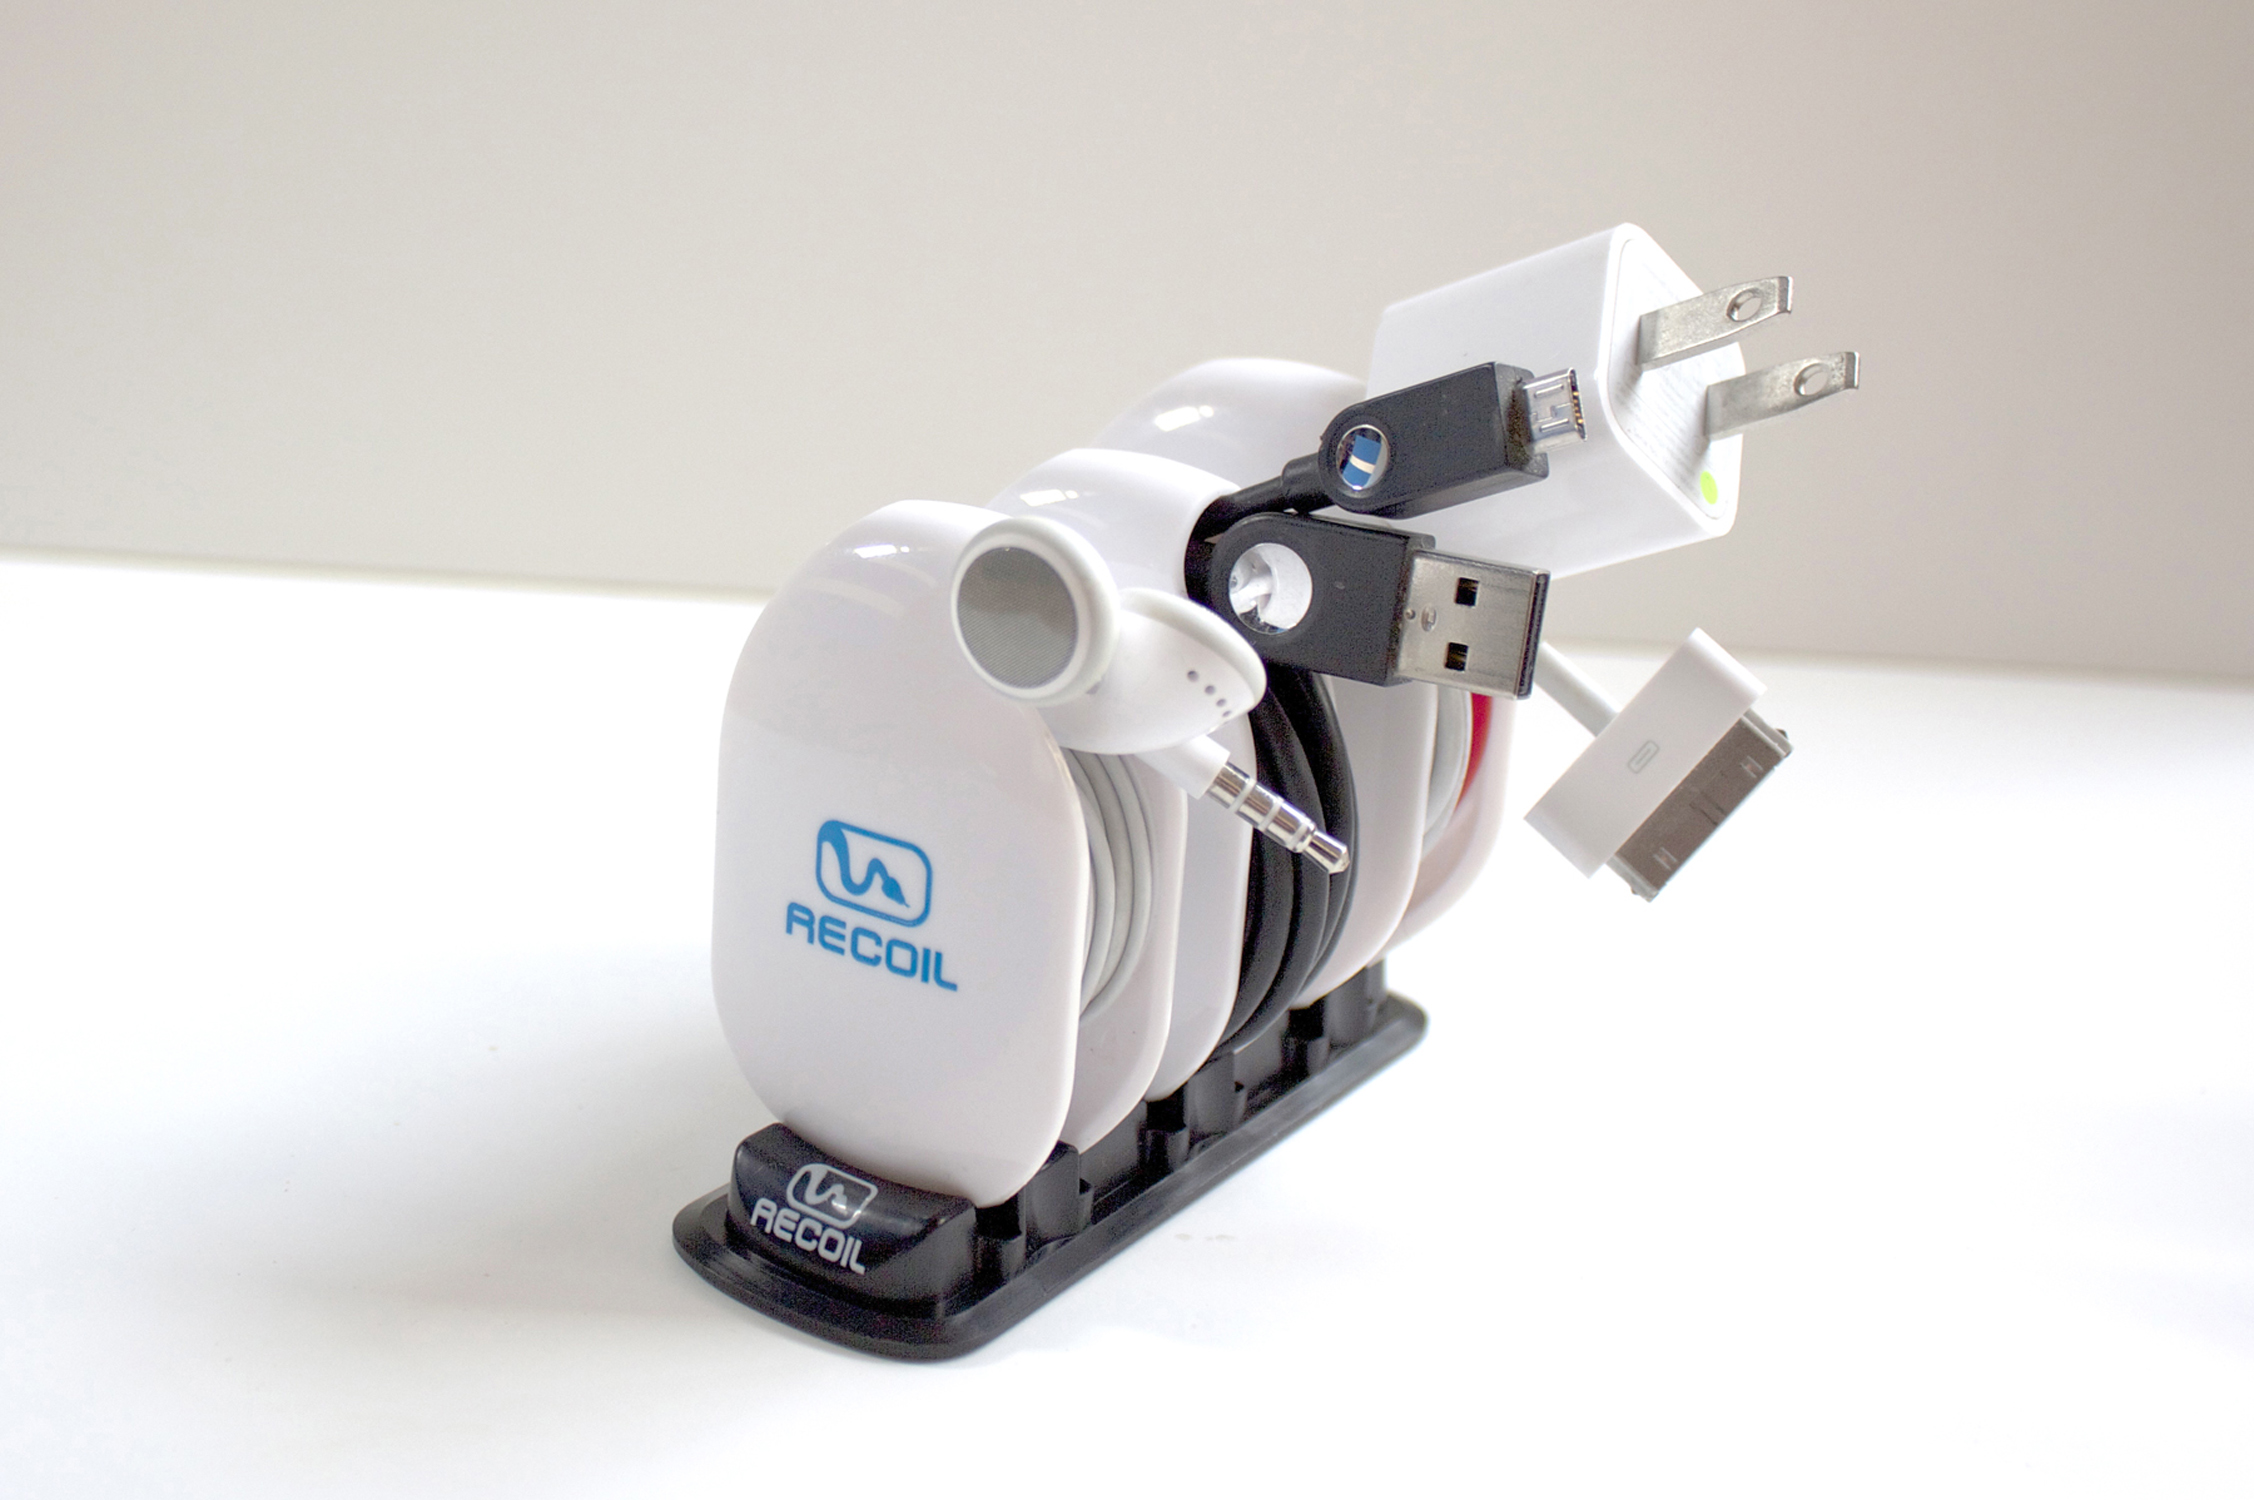
The Recoil Combo Pack
Recoil Automatic Cord Winders
Recoil Winders
$9.99 each or set of 3 for $27.99
(Set of 3 Combo Pack comes with Storage Rack)
I’ve had the theory that any two cables laid side-by-side, as neatly as possible, will somehow, through the magic of universal entropy, become impossibly entangled without human intervention. I’m sure you’ve experienced this too. The funny thing is that now my theory has a corollary: Any cable will become impossibly entangled upon itself in a pocket, a drawer, or even on a desktop. I just want to know why that is.
Often, on my way to gym, I place my earbuds into my pocket so that I don’t look like a total nerd until I get to the weight machines. I pull out my iPhone. I retrieve my earbuds, untangle my earbuds, place my phone back into my pocket and start my workout.
Even funnier than my theory, is that the five minute drive and two minute walk into the gym, collects enough entropy to twist and mangle my earbuds into knots and Moebius strips that require another ten minutes, forty calories (OK, I’m thankful for the calorie burn), quite a bit of cussing, and a whole bucket of frustration to detangle the !@#$% things.
And now here’s where I sound like a late night infomercial, which I hate more than detangling my earbuds every time I use them.
But, has this ever happened to you?
Well, now there’s a solution: The Recoil Winder.

Large winder loaded with USB cable.
Yeah, I know, a TV Pitchman could say it better and with more zeal. But seriously, you know what I’m talking about with tangled earbuds, USB, and Apple power cords. It’s enough to make me want to break the law. The Second Law of Thermodynamics that is.
The Recoil Winder is a clever little gadget that comes in three sizes so that you can organize your earbuds, USB power cables, Apple power cables, and other small gauge electronic cables into a neat little entropy-defying package that fits neatly into your pocket, purse, backpack, or whatever.
The video provides a far better look at the product than I can give you in text format. Take a look to see what I mean.
I use the smallest winder for my earbuds. No more cussing. No more ten minutes wasted at the beginning of every workout trying to untangle tasteless spaghetti. No more starting my workout with an elevated anxiety level. One tug and the cable is out. And it’s just as easy to load: just loop, pull, and let the Recoil Winder do its job.
I should warn you that the Recoil Winder really grabs the cable, so you need to be careful until you acquaint yourself with the product by practicing a few times. And when you remove a cable for use, pull it all the way until the Winder stops and locks, otherwise, you might loosen your grip and allow the cable to rewind onto the Recoil Winder unexpectedly. You can see for yourself in the demo video that you need to keep your fingers out of the way. Don’t worry, after a few times, you’ll get the hang of it.
The Recoil Winder is a cool product. I’m not sure how I kept my cables organized and out of the way before. You see, it’s not just a winder product, it’s also an organizer. I have trouble keeping track of my cables. One reason is that they get tangled up. The other reason is that they tend to get lost. Now they do neither.
The Recoil Winder is one of those products that you look at and think, “I should have thought of that.” It’s both handy and obvious that you need it. The only problem that I have is that I have more cables than Recoil Winders.
The only three negatives I’ve found with the Recoil Winder is that one, I wish they made bigger ones for laptop cables–I hate those things. Two, $9.99 is a little steep for as many as I need. If you only need one, two, or three, you’re OK. I need like ten or so to keep all of my various gadget cables tangle-free and where I can find them easily. And finally, the third negative is that I wish that I could pull out a cable part way so that I could use the cable but keep it partially wound.
Maybe in Recoil Winder 2.0, they’ll add that feature.
Why it’s frugal: The Recoil Winder is frugal because it keeps you organized and that has value. If you’re fumbling around for a USB cable, earbuds, or other cable, you’re neglecting something else. And the Recoil Winder only takes about half a second to wind a cable. It saves you time, which is essentially money.
Review: 9/10
Recommendation: Pick one up and try it out. Chances are very good that you’ll buy more–one for each annoying cable that you have.
 Techopedia
- An error has occurred; the feed is probably down. Try again later.
Datamation
- USA₮ Modernizes American Payments with High-Impact St. Patrick’s Day Activation in Times Square
- Google and NextEra Strike AI-Powered Grid Deal
- NYT Sues Perplexity AI in Copyright Conflict
- Cloudflare Outage Affects Major Websites
- OpenAI Forces AI to Confess Its Lies
- OpenAI Declares Code Red as Google’s Gemini 3 Threatens ChatGPT
- Coupang Breach Exposes 33.7M South Koreans’ Data
- ChatGPT Celebrates Third Anniversary
- Asahi Group Reveals Findings of Cyberattack
- OpenAI Discloses Mixpanel Security Incident Affecting Some API Users


You must be logged in to post a comment.